If like me your company uses SharePoint 2010 and have multiple sites, you will know that backups can be a pain, i have had lots of issues in the past getting SharePoint to backup correctly using a variety of different third party applications, all of which required me to setup a new user with all the required access rights to the sites and so on and so forth.
I have also used the built in backup features within the Central Administration Site and although this works perfectly its a pain to be going in there everyday to do the backups of each site and also the whole farm. I decided that it would be much easier and simpler to just use the built in Powershell and write a few scripts to do this for me automatically.
I first of all thought of how i wanted to backup the sites and where to, i did much reading on the internet and mainly the MSDN site reading through the CMDlets that can be used within the SharePoint Powershell.
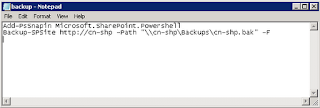
So here are the scripts that i ended up writing to get the job done, first of all create a folder on the C Drive of your SharePoint server called Scripts, Next open up notepad or a simple txt file editor the first line of the script needs to call the SharePoint Powershell snap in as below.
"Add-PsSnapin Microsoft.SharePoint.Powershell"
the second line has to have at the beginning the CMDlet that is to be used so in our case would be
(Backup-SPSite) the followed by the site address to be backed up (http://cn-shp) then after this we need to put in the path of the backup location followed by the file name of the backup file (-Path "\\Server\Backup\cn-shp.bak") then followed by the forced command which is (-F)
so our script will look like the image below
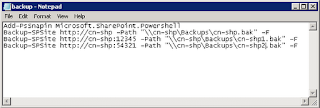
If you have more than one site to backup then you can add the rest of the script in place like the image below following the same rules as above.
When you have finished make sure to save the file as backup.ps1, so go to File > Save As, then put in the name of Backup.ps1, you can change the file type by changing the drop down in notepad in the bottom right corner when saving as the image below.
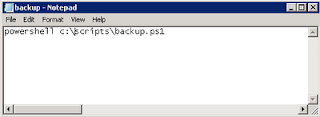
Now that you have your Powershell script written time to move onto the batch script to run the Powershell from a scheduled task, open up notepad once again, In the notepad file simply type,
(powershell c:\scripts\backup.ps1) you will need to also save this one the same way as above but this time it needs to be a batch file with the file extension of .bat you can also call this backup if you would like to as i have done on my example, save it to C:\Scripts\Backup.bat .
Now to add it as a Scheduled Task to run nightly, if your running windows server 2008 click on Start then go to Administrative Tools and then to Task Scheduler in server 2003, click on Start then go to Control Panel then to Scheduled Tasks.
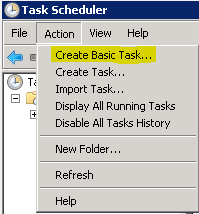
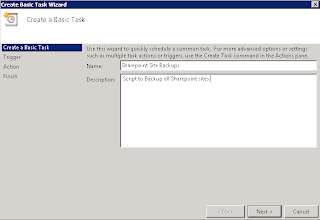
In Server 2008 Click on Action at the top and then Create Basic Task
In the Create Basic Task Wizard give you task a name i have called mine Sharepoint Site Backups but you can call it what ever you want to suit your needs, you can also put in a brief description if you want to also.
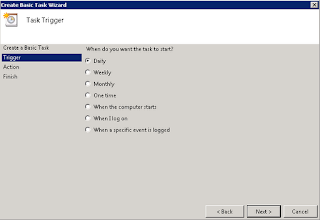
Once you have filled out the information click on the Next button, choose the action so we want to do a daily backup so select the Daily radio button and click on the Next button.
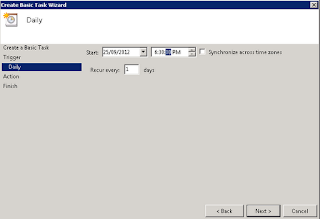
you will then be asked to put in the time you want the backup to start and how often you want it to recur the default is 1 Days, then click the Next button to continue.
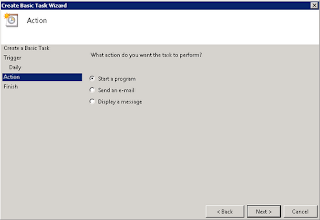
On the Action page you want to select the Start a Program radio button as we want it to load our batch file up, then click on the Next button.
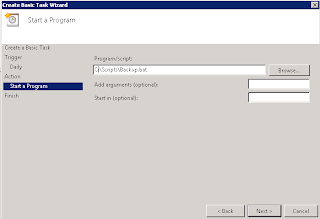
On the Start a Program menu click on the browse button and browse to C:\Scripts\ and select your Backup.bat script leave the Add Arguments and Start in both blank and click on the Next button.
Once you have done this you can click on the Finish button and you have set your scripts in place to run every night at 6:30PM
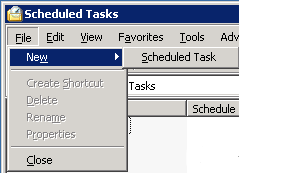
For Server 2003 Click on File and the New > Scheduled Task
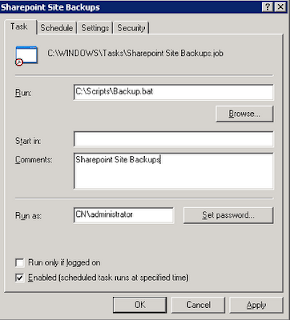
By Default it creates the task and you can change the name of it like the image below, once you have done this double click in the task itself and the you can change the details.
Click on the Browse button and go to C:\Scripts\ and select the Backup.bat file and click on OK, put in the a Comment if you want to also and select the user that you want to run the script, put a tick in the Enabled box then move on to the Schedule Tab at the top.
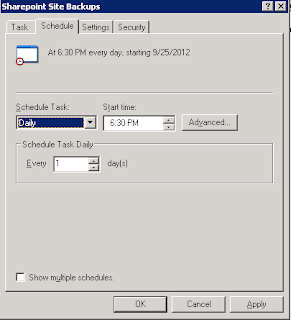
On the Schedule tab choose how often you want to run the task so i chose Daily and also the time in which to run it which is 6:30PM, leave the default of Every 1 Day and click on the OK button to finalize the task.
Your Backups will now run every evening and will be saved in to the specified folder that you put in your script, no i copy my backups to a folder which is shared on the same server so if you need to copy these into another location once they have finished backing up for instance to a external backup drive or such then you can use the following script top then copy them to another location.
You will also want to automate the running of this script also but not until the other backups have finished i leave roughly 2 hours for my backups to finish before i have Task Scheduler run the script, this script basically work by copying the contents of the folder Backups on the E:\ Drive which is shared as (\\cn-shp\Backups) to a network drive Z:\ which is a Backup USB drive that is taken off site the extra characters on the end of the Z:\ tell xcopy to create a folder named with the date so that it does not overwrite and existing backups, when the script has then finished copying the files it will remove the entire folder and then recreate it ready for the next backup the following day, you can however change the feature of this script to suit your needs.

No comments:
Post a Comment