Friday 2 May 2014

All my shortcuts are opening with the wrong programs

All Shortcuts have changed to open with one program I have seen this one a number of times and at first it looks as though it might be an impossible problem to fix, many people will tell you that windows would need to be reinstalled or that it cant be fixed.
But superkev has the know how to get you back working as you should be.
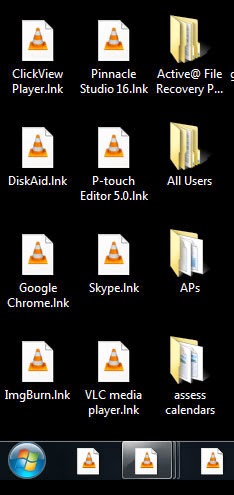
So you open up your computer and this is what you see all of your icons have changed mysteriously to the one program and everytime you try to open a shortcut to the internet or you favorite game it fails and tries to open with what ever program is asscociated with that file type.
Shortcuts
You can change the file asscociations in Default Programs on the start menu but this wont help you in this situation as the files which have changed are all .lnk files which are shortcuts, these files do not have a specific program attached to them and that is all you can fix in Default Programs. so the first step is to download this file from my blog on another computer or if you already know how to load up your browser from the original EXE file then you can use your own computer.
Once you have downloaded the file open it up and extract the contents.
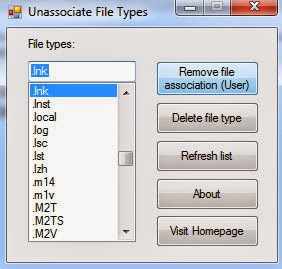
Run the program called Unassoc.exe and you will be greeted with the window as below
Unassociate
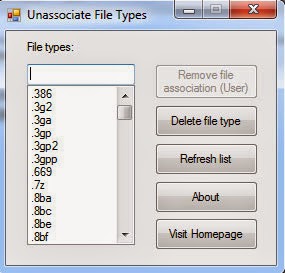
You then need to type in the search box .lnk and select the .lnk option.
unassociate 2
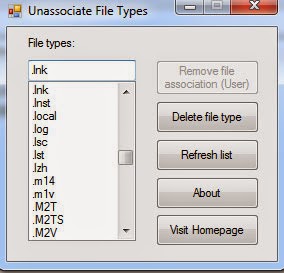
Press the Remove file association (User) button.
Unassociate 3
Once this has finished you can click on the OK button.
Unassociate 4
You will now notice that all of your shortcuts are back to normal with the correct icon for each program.
Normal

Repair Windows 7 Install After Replacing Motherboard

Repair Windows 7 Install After Replacing Motherboard Ever wanted to not have to reinstall after replacing your motherboard on windows 7 ? this is not a issue if you replace with identical hardware but if you are unable to find that same motherboard then this is the fix for you.
You will need to get the latest drivers for your new motherboard these can be found on the manfacturers website, the main driver that you are looking for is the hard drive controller driver IDE/AHCI/SATA.
Once it ahs finished downloading them put them on a USB or burn them to a cd.
Once you have this turn on your comptuer with your new motherboard installed and put in the windows 7 cd choose to boot from cd by pressing the appropriate button once you get to the screen as below, choose your language and keyboard layout and press next.
step 1
On the next window chosse to repair your computer
Step 2
On the next window choose the command prompt, the startup repair wont fix this issue 9 times out of 10 but you are free to give it a shot, if it does not work and you get a BSOD then follow the steps above to get back to this point.
Step 3
If you burned the drivers to a disk then eject the windows cd and put in your drivers cd or just plug in your USB, You need to figure out which drive your cd/thumbdrive/external drive is – so try different drive letters and type dir until you see the one that has your folder. if you burned a cd, chances are it’s the D: drive(unless it was an HP or something, then it will be E:)if it’s a thumb drive or external hard drive and you only have 1 cd-rom, it’s the E: drive. Maybe F: — check it out.
Once you have that figured out you need to type this
Step 4dism /image:c:\ /add-driver /Driver:X:\ /recurse
Replace “X” with the drive letter from the previous step:
Hit enter and it should find the drivers you extracted into the folder in the second step.
Step 5
After it does that, type “exit” and hit enter, then press the “Restart” button.
When windows boots it will take a LONG time to start this is normal do not press the reset button as this will make you have to start over again from the start, go sit back and grab a coffee and wait, once it has booted up fully you will more than likely have to install the rest of your drivers for your new motherboard.


The Computer Restarted unexpectedly or encountered an unexpected error during installation of windows

Untitled Document Ive been a little slack of late when it comes to blogging, had heaps of work to do and not enough time to blog, but whilst i have been working away hard i have come accross a few issues that i would like to share with you all.

This one was a bit of a pain when i was recently recapturing my distribution image at school, over the school holidays i thought it would be a great time to re-image the student computers with all the latest updates for the applications i had previously installed.
I fired up my previous image i had in Hyper V, so that i could install the updates and recapture it again ready for deployment, to my surprise when it turned on i was greeted with the screen shot below, i was aware that running SYSPREP would make the computer think that it was a fresh install on the first turn on, but i wasnt expecting to see the error below.
Error Message
so here is how to fix the error then you can boot into your image to install your updates.
Step 1. When you see the error dont click on OK hold down the SHIFT key and press F10, this will open a command prompt window.
Step 2. type in regedit like the image below and press the enter key.
CMD Window
Step 3. Navigate to the following registry entry HK_Local_Machine/SYSTEM/SETUP/STATUS/ChildCompletion, find the key called Setup.exe and change the value from 1 to 3, once you have done this close down regedit and then hit the OK button on the error window and the computer will reboot, it will go through the same process as before "Setup is preparing your computer for first use" but this time it will actually get you to the login screen then you can login and continue installing your updates.
Regedit