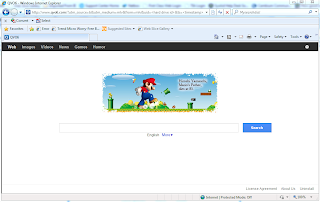
I recently had to remove this for a member of my staff who unfortunately got hit with this one and it was a pain in the bum to remove, every time you change the homepage and close and reopen the browser it would reappear again.
To remove this follow the steps below and you should be free of this hijacker for good.
First off i would run an anti malware program such as malwarebytes or combofix to eliminate any hidden files that it may have downloaded without your knowledge.
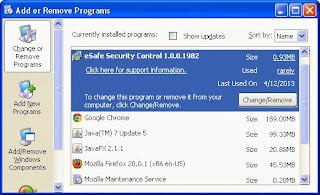
Then i would also go in to your programs and features within control panel and uninstall any instances of qv06 like toolbars and such.
Once you have done this then follow the directions below to remove it from your home page within your preferred browser, if you use more than one browser then repeat the steps below on all browsers.
Internet Explorer
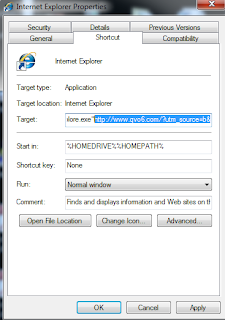
Step 1.Click the right mouse button over Internet Explorer's shortcut (it should be on your Desktop). Here, choose 'Properties', locate 'Target field' and eliminate all text, which is related to Qvo6 and is entered after "C:\Program Files\Internet Explorer\iexplore.exe".
Step 2. Open Internet Explorer, go ‘Tools‘ -> ”Manage Add-ons’ -> ‘Toolbars and Extensions’. Here, look for Qvo6 and click 'uninstall'. Now open IE -> Tools -> Internet Option -> General tab. Enter Google or other address to make it the default start page.
If you have any shortcuts pinned to the taskbar along the bottom then you will need to un-pin them by right clicking and then reopen internet explorer from the start menu or desktop and then right click on the icon and select Re pin this Program to the Task bar.
Google Chrome
Step 1. Open your browser, go to Google Chrome Settings, in the “On Startup” area, please click on Set pages.

You will now see Startup pages, in this page, click on the X button to delete Qvo6.com.
Once Done click on ok and you will return back to the settings page.
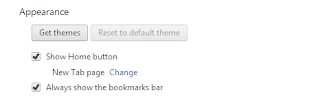
Step 2. Click on the Appearance area, and then click Change.
Remove qvo6.com from the Open this page tab and then Select Use the New Tab page and click OK to save changes
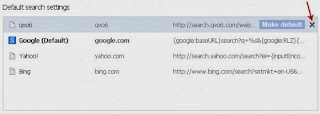
Step 3. Move down to the Search section and click on the manage search engines button.
Select Google or any other search engine you like from the list and make it your default search engine then select Qvo6 from the list and remove it by clicking the "X" mark as shown in the image below.
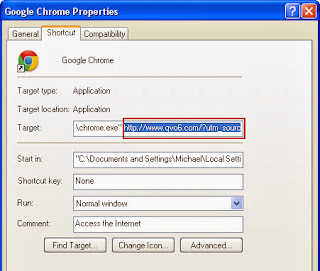
Step 4. Close down Chrome and then find the shortcut either on your desktop or on the start menu and right click and select properties, In Shortcut tab, please remove "http://www.qvo6.com...." from the Target field and click OK to save changes.
Once you have clicked on OK and the properties window has disappeared you may need to re pin your shortcut on the task bar like above for internet explorer, simply open chrome again and then right click on the chrome icon on the task bar and select Pin this Program to Task bar.
Firefox
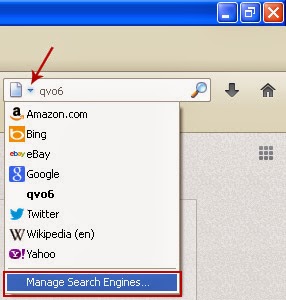
Step 1. Click on the Qvo6 search icon as shown in the image below and select Manage Search Engines.
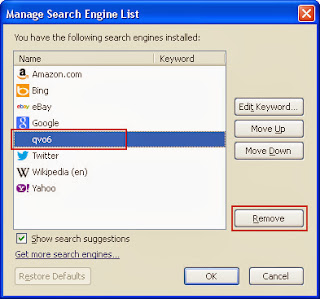
Step 2. Select Qvo6 from the list and click Remove to remove it. Click OK to save changes.
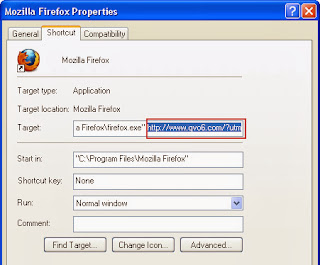
Step 3. Find the Firefox shortcut on your desktop on on the start menu and right-click on it.
In Shortcut tab and remove "http://www.qvo6.com...." from the Target field and click OK to save changes.
Once you have clicked no OK you may need to un pin and re pin your shortcut to the task bar again simply find your shortcut and open it and then right click and select Pin this Program to Task bar.
If you are still experiecning issues with firefox you can also reset your web browser to original state. To use that, please follow steps below:
1. At the top of the Firefox window, click the Firefox button; go over to the Help sub-menu and select Troubleshooting Information.
2 Click the Reset Firefox button in the upper-right corner of the Troubleshooting Information page.
Firefox will close and be reset. All data keep in Firefox will be removed, please save your important date before you move on.
Once this has been completed i would also run another scan with your anti malware program to double make sure that it is completely gone
