Its been a while since i have blogged, so windows 10 is now upon us and as the normal IT geek that i am i decided to update all the computers in the house.
I have been pretty happy with it so far and as i am running a domain in the house i made sure that i connected them to my domain as i am running Windows 10 Pro, this was simple and works as expected, one thing that i have set by default by group policy was to turn of the very annoying UAC (User Account Control) as i want to be able to run my programs and other apps without being asked do i want to do this, are you sure you want to do this.
Now this has caused me a slight issue when it comes to viewing images, as the bulit in Photos app will not run whilst UAC is disabled much like all of the Windows Store Apps. I didn't really like it much anyway i much prefer the older Windows Photo Viewer, so i set out finding a way to get this app working so i could view my pictures again.
Follow the steps below and you will have it back working in no time at all.
Step 1.
Open up Regedit, click on start or just type regedit in the search box at the bottom of the screen, once it shows you the regedit icon just click on it.
Step 2.
Browse to the following registry key
HKEY_LOCAL_MACHINE\SOFTWARE\Microsoft\Windows Photo Viewer\Capabilities\FileAssociations
You will need to add the following entries as string values, dont worry that they all have .Tiff at the end this is normal and is not related to the image file type .TIF
.bmp PhotoViewer.FileAssoc.Tiff
.dib PhotoViewer.FileAssoc.Tiff
.gif PhotoViewer.FileAssoc.Tiff
.jfif PhotoViewer.FileAssoc.Tiff
.jpe PhotoViewer.FileAssoc.Tiff
.jpeg PhotoViewer.FileAssoc.Tiff
.jpg PhotoViewer.FileAssoc.Tiff
.jxr PhotoViewer.FileAssoc.Tiff
.png PhotoViewer.FileAssoc.Tiff

Step 3.
Now open the Set Default Programs by typing settings in the search box next to the start button then click on settings.
![]()
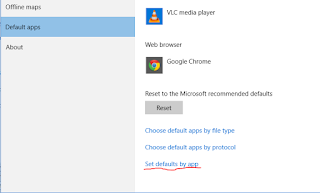
Now type defaults and then click on the Default app Settings, scroll down to the bottom and click on Set Defaults By app.
Step 4.
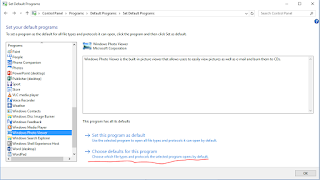
Now scroll down to Windows Photo Viewer and click on Set this program as default, then click on choose defaults for this program, you can now select all of the file formats we put in regedit earlier and click on save.

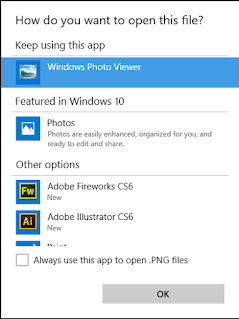
Thats all you need to do, now double click on an image file and it will either open straight up in Windows Photo Viewer or you will get the option to select Windows Photo Viewer and you can tick the box that says Always use this app to open files.