Tuesday 3 February 2015

iPhone Exchange Emails not Syncing

If you have ever used your iPhone/iPad to conencto to an enterprise exchange account you will probably of come accross this issue, or atleast your IT person will have.

Since Exchange 2007 there has been a bug where the permissions are not working as they should do, and you have to manually set inheritable permissions on the Exchange servers object in the User's Security settings on their AD Account.
To do this follow the steps below.

Go to your Domina Controller and open up Active Directory Users and Computers.
Click on View and then make sure Advanced Features is ticked as per the image below.


Then scroll down to where your users are located and fine the relevant user, right click on them and then go to properties, and then to the security tab.


Once you are in the click on the Advanced button near the bottom right corner.


Once you have opened it up you need to select Exchange Servers and then put a tick in the "Include Inheritable Permissions" box and then click on OK.

Leave it a few minutes then your emails should start to come through, this is a bug in all versions of Exchange from 2007 upwards and is still yet to be fixed.

Monday 2 February 2015

ICMPv6 Broadcast Storm - Wireshark Network Diagnostics


Wireshark Netowrk Diagnostics - ICMPv6 Broadcast Storm When i got back to work after the wonderful xmas break i made a start on installing 50 new desktop computers, so i fired up my imaging system (MDT + WDS) and imaged all of the computers no problems.
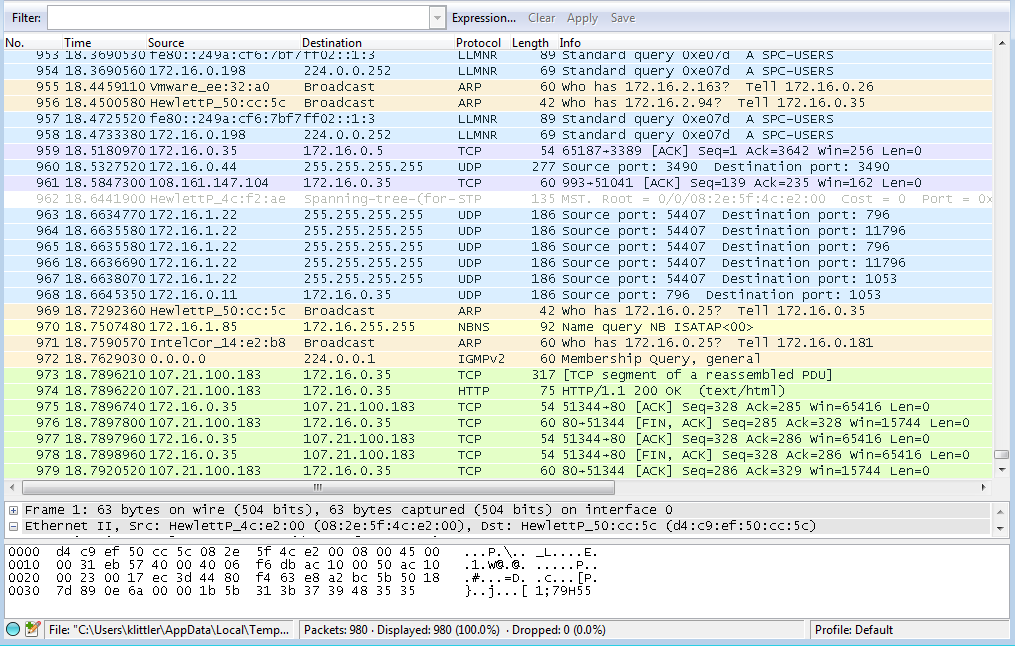
Not to long after i had finished my imaging i noticed that the network was slowly but surely grinding to a halt, all my servers kept dropping out, the wireless controller was having a fit and then pretty much everything was stuffed, i decided i needed to get wireshark running to see what was going on and straight away i was confronted with the following image below.
Wireshark
Lots of RED NOOOOOOOOOOOOOOO if you have ever used wireshark before you will know that seeing this much red is not a good thing, after 1 minute of packet capturing there was over 1 million packets, the network was literally brought to its knees.
When i stopped the capture i clicked on one of the red lines and drilled down, i found the mac address of the offending computer and then went onto the dhcp server to try to find it.
After a short while of searching i found it in the system and to my surprise it was one of the new computers i had imaged earlier in the week.
I then went on to the net to check out why it was causing issues, the network card in the new computers was the intel i217-lm, the driver i was using was the most recent one from the HP website so this should be fine right... ummmm no that would appear not to be the case, i found that the specific driver which was 12.10.30.5890 dated 16/12/2013 has issues whilst the computer is in hibernation, sending out literally millions of ipv6 requests and when you have more than one of these suckers thats when the broadcast storm starts up.
We dont use IPV6 in our network so i started the process of disabling all of the IPV6 settings on the network card, but the issue still remained so i then headed over to the intel website and found out that the driver on the HP website was sooooooo out of date, i downloaded the latest driver from the intel website and proceeded to install it on all of the other computers, once i had finished installing the driver and changed the remaining wake on lan and IPV6 settings i ran another scan in wireshark and the proof was in the pudding as per the picture below.
Wireshark 2
After a few reboots of the switches everything was operating back at a normal pace.

Friday 29 August 2014

The Specified Procedure Could Not Be Found - Windows 7

The Specified Procedure Could Not Be Found

This one was new to me, i was fixing a computer that had the power jack broken off inside the laptop, i managed to remove the broken bit by taking the whole laptop to bits and removing the offending item with a pin, once i put it back together the laptop would not boot into windows, it would boot into safe mode which tells me there is some form off corruption somewhere.

I then did the standard start up repair and windows told me that there was no errors to fix and then just rebooted with the same results, i then moved on to doing a system restore, each one of these system restores said it had failed but it actually did restore the computer to the requested state, once i had rebooted it was telling me that it was installing windows update (sigh) i let it run through and then after the computer rebooted normally i was fronted with the below error at the login screen.

the Specified Procedure Could not be found

I couldnt even log in as local admin, which to me seemed a little odd, i did a little bit of googling and pretty much found nothing of interest, other than reinstalling windows from scratch, that was not an option as the job was only to fix the broken power jack and nothing else, but i couldnt return the laptop in this state so i once again fired up windows and pressed the F8 key so that i could go in to "Repait My Computer", this time around i chose not to do the standard startup repair as they never work anyway, this time i chose command prompt and i wanted to run a CHKDSK, this sometimes works for files that are not in the correct places and such, i then chose my C drive by typing cd /D C: and pressing enter, once i had my C Drive selected i typed CHKDSK /f (this fixes errors on the volume) once this had gone through i rebooted the computer but it was still in the same state.

The next step was to do the same again by pressing F8 on start up and selecting Repair My Computer, and again go into a command prompt, only this time i didnt run CHKDSK i run the SFC tool (System File Checker) i then chose the C Drive again as per above CD /D c: once the C Drive is selected i just typed the basic SFC command which is sfc /scannow nad pressed enter, this did not work as it stated that there was a previous repair that windows needed to reboot to fix, i ignored this and typed in the full SFC command like below

sfc /scannow /offbootdir=C:\ /offwindir=C:\windows

This took a long time to run but it found all of the corrupt files and repaired them successfully, i then rebooted and was able to login to the computer as per normal.

Friday 2 May 2014

All my shortcuts are opening with the wrong programs

All Shortcuts have changed to open with one program I have seen this one a number of times and at first it looks as though it might be an impossible problem to fix, many people will tell you that windows would need to be reinstalled or that it cant be fixed.
But superkev has the know how to get you back working as you should be.
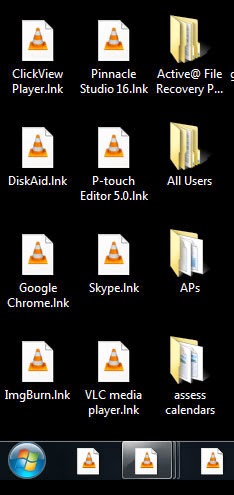
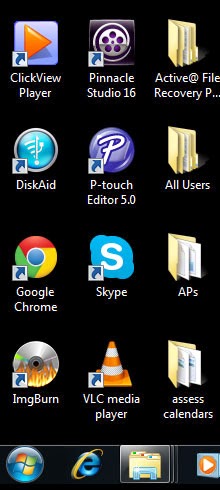
So you open up your computer and this is what you see all of your icons have changed mysteriously to the one program and everytime you try to open a shortcut to the internet or you favorite game it fails and tries to open with what ever program is asscociated with that file type.
Shortcuts
You can change the file asscociations in Default Programs on the start menu but this wont help you in this situation as the files which have changed are all .lnk files which are shortcuts, these files do not have a specific program attached to them and that is all you can fix in Default Programs. so the first step is to download this file from my blog on another computer or if you already know how to load up your browser from the original EXE file then you can use your own computer.
Once you have downloaded the file open it up and extract the contents.
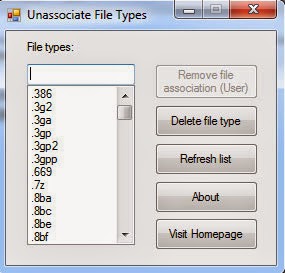
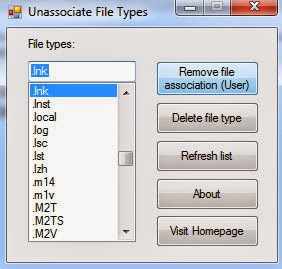
Run the program called Unassoc.exe and you will be greeted with the window as below
Unassociate
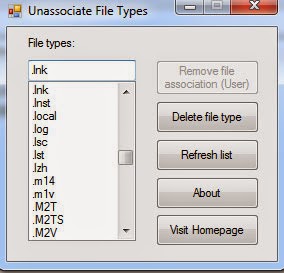
You then need to type in the search box .lnk and select the .lnk option.
unassociate 2
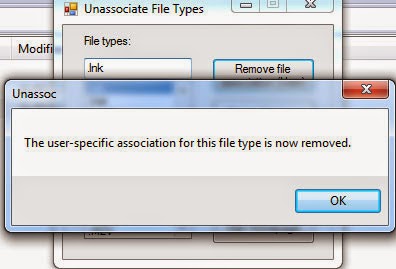
Press the Remove file association (User) button.
Unassociate 3
Once this has finished you can click on the OK button.
Unassociate 4
You will now notice that all of your shortcuts are back to normal with the correct icon for each program.
Normal

Repair Windows 7 Install After Replacing Motherboard

Repair Windows 7 Install After Replacing Motherboard Ever wanted to not have to reinstall after replacing your motherboard on windows 7 ? this is not a issue if you replace with identical hardware but if you are unable to find that same motherboard then this is the fix for you.
You will need to get the latest drivers for your new motherboard these can be found on the manfacturers website, the main driver that you are looking for is the hard drive controller driver IDE/AHCI/SATA.
Once it ahs finished downloading them put them on a USB or burn them to a cd.
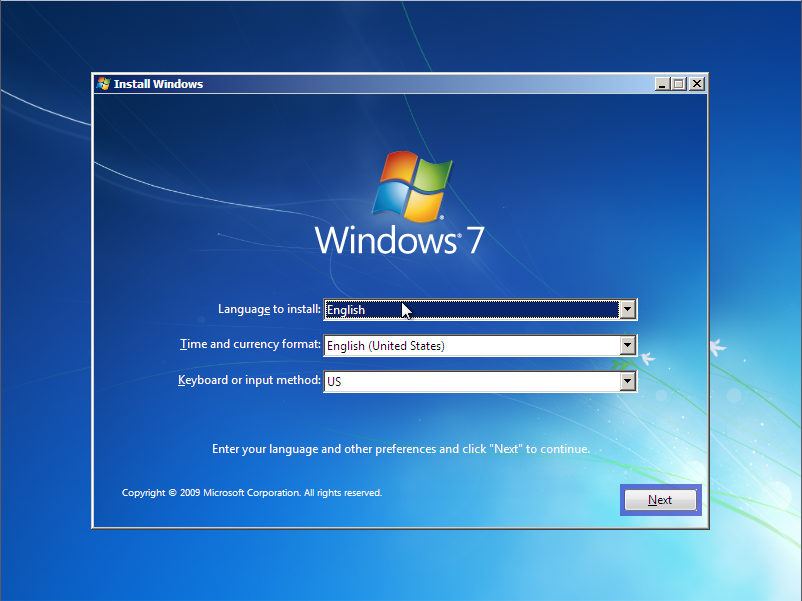
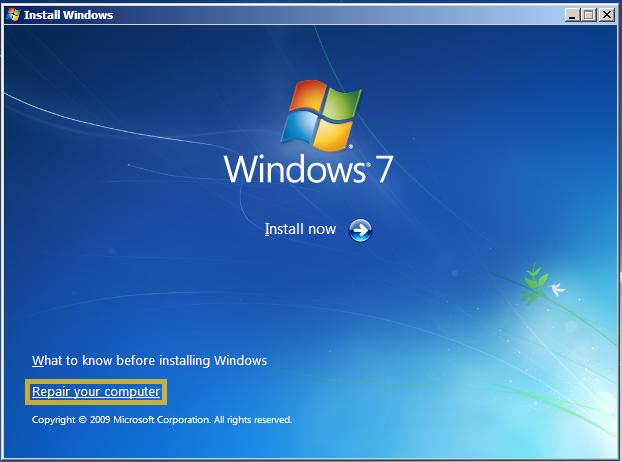
Once you have this turn on your comptuer with your new motherboard installed and put in the windows 7 cd choose to boot from cd by pressing the appropriate button once you get to the screen as below, choose your language and keyboard layout and press next.
step 1
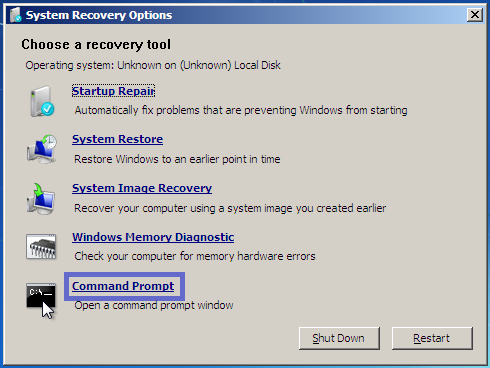
On the next window chosse to repair your computer
Step 2
On the next window choose the command prompt, the startup repair wont fix this issue 9 times out of 10 but you are free to give it a shot, if it does not work and you get a BSOD then follow the steps above to get back to this point.
Step 3
If you burned the drivers to a disk then eject the windows cd and put in your drivers cd or just plug in your USB, You need to figure out which drive your cd/thumbdrive/external drive is – so try different drive letters and type dir until you see the one that has your folder. if you burned a cd, chances are it’s the D: drive(unless it was an HP or something, then it will be E:)if it’s a thumb drive or external hard drive and you only have 1 cd-rom, it’s the E: drive. Maybe F: — check it out.
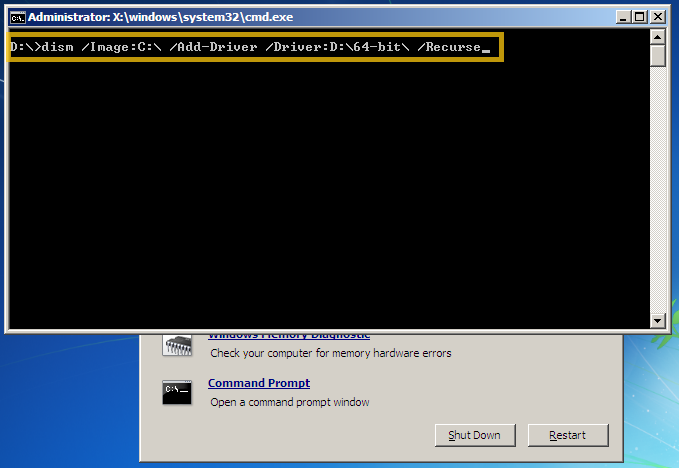
Once you have that figured out you need to type this
Step 4dism /image:c:\ /add-driver /Driver:X:\ /recurse
Replace “X” with the drive letter from the previous step:
Hit enter and it should find the drivers you extracted into the folder in the second step.
Step 5
After it does that, type “exit” and hit enter, then press the “Restart” button.
When windows boots it will take a LONG time to start this is normal do not press the reset button as this will make you have to start over again from the start, go sit back and grab a coffee and wait, once it has booted up fully you will more than likely have to install the rest of your drivers for your new motherboard.


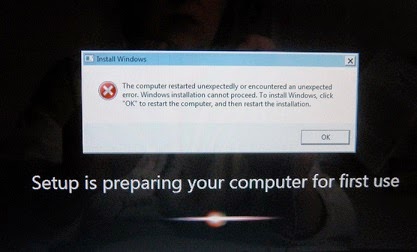
The Computer Restarted unexpectedly or encountered an unexpected error during installation of windows

Untitled Document Ive been a little slack of late when it comes to blogging, had heaps of work to do and not enough time to blog, but whilst i have been working away hard i have come accross a few issues that i would like to share with you all.

This one was a bit of a pain when i was recently recapturing my distribution image at school, over the school holidays i thought it would be a great time to re-image the student computers with all the latest updates for the applications i had previously installed.
I fired up my previous image i had in Hyper V, so that i could install the updates and recapture it again ready for deployment, to my surprise when it turned on i was greeted with the screen shot below, i was aware that running SYSPREP would make the computer think that it was a fresh install on the first turn on, but i wasnt expecting to see the error below.
Error Message
so here is how to fix the error then you can boot into your image to install your updates.
Step 1. When you see the error dont click on OK hold down the SHIFT key and press F10, this will open a command prompt window.
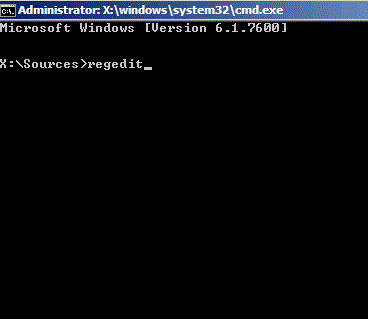
Step 2. type in regedit like the image below and press the enter key.
CMD Window
Step 3. Navigate to the following registry entry HK_Local_Machine/SYSTEM/SETUP/STATUS/ChildCompletion, find the key called Setup.exe and change the value from 1 to 3, once you have done this close down regedit and then hit the OK button on the error window and the computer will reboot, it will go through the same process as before "Setup is preparing your computer for first use" but this time it will actually get you to the login screen then you can login and continue installing your updates.
Regedit

Sunday 13 October 2013

iOS 7 Voice Memo 00.00 Fix

Have you upgraded to iOS 7 recently and tried to use the Voice Memos App ?

If you use the voice memo for long recordings (above 15 minutes) you may have noticed that when you finish your recording and it asks you to name it that when it has been named that th length of the recording shows at 00.00, and does not play back what you just recorded.

after much research and reading online including on the apple forums not one apple rep had mentioned when or how to fix this issue. although i do not have an iPhone anymore i still have an iPad and Apple TV, not that i use the memos but even so this still needed to be investigated.

So as a temporary fix (maybe permanent) if you have any previous recordings from your older iOS from before the upgrade, then make sure that these are backed up in iTunes.

Once they have been backed up then delete them all out of your voice memos app, and try a new recording i tried a long recording of about 35-40 minutes just to ensure that it was not a fluke that it worked, once it had finished recording and i had renamed it i then checked to see if it worked and it did.

I then proceeded to make another recording to see if the initial fix would work (the fact that old recordings were present) once again i made a 30 minute recording and then i renamed and saved and once again the recording saved and replayed fine, thus leading me to the conclusion that any older recordings made prior to iOS 7 are not compatible with the new revamped Voice Memos app for iOS 7, so until apple fix this issue i would recommend that you do the above to capture your meetings/lectures.

Tuesday 1 October 2013

MDT Error - Windows could not parse or process the unattend answer file for pass

So its the school holidays with a week left i decided i needed to install some new applications on the school computers and the easiest way to do that was to create a new image and roll it out using MDT 2012.

I made my image in Hyper V and installed all the latest versions of java,flash and a few other new applications that we want to use in the new school term.

All good i created it all and captured it ready for deployment, imported the WIM file into MDT and recreated my Litetouch files and then reimported them into WDS ready for PXE booting.

I have a test machine in my office that i roll out all new images to before i go ahead and do the rest of the computers, i fired it up pressed the F12 key to tell the computer to PXE boot, it connected to the server and started into the Deployment system, i then chose the new image and told it to begin.

All went well until the computer rebooted after seeing the screen ( Setting up your computer fo rthe first time) then this error appeared.

Windows could not parse or process unattend answer file [C:\windows\Panther\unattend.xml] for pass [specialize]. A component or setting specified in the answer file does not exist.


I was thinking this is a little weird as nothing in the answer file MDT creates would have chenged as it was the same answer file i had used before i just updated the WIM file.

After a little digging and checking the log files i realsied that it was to do with the fact that the new image had Internet Explorer 10 installed, so i had to look through the answer file to find out where it was specified.

This took a little bit of research and trial and error but i eventually found the issue, it was basically this line of code in the asnwer file.

<IEWelcomeMsg>false</IEWelcomeMsg>

To fix this issue i simply commented out the whole line saved the xml file and then ran the deployment again, and viola it works as it should do.

So open up your answer file in either notepad or another plain text editing program and search for the line of code

<IEWelcomeMsg>false</IEWelcomeMsg>

And change it to this

<!-- <IEWelcomeMsg>false</IEWelcomeMsg> -->

If you use notepad ++ then it will automatically change the line to green to show that it has been commented out.


Tuesday 24 September 2013

Removal of qv06.com Browser Hijacker

Removing qv06.com Browser Hijacker

I recently had to remove this for a member of my staff who unfortunately got hit with this one and it was a pain in the bum to remove, every time you change the homepage and close and reopen the browser it would reappear again.
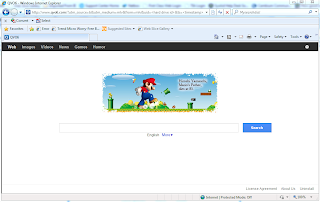
qv06.com removal
To remove this follow the steps below and you should be free of this hijacker for good.

First off i would run an anti malware program such as malwarebytes or combofix to eliminate any hidden files that it may have downloaded without your knowledge.

Then i would also go in to your programs and features within control panel and uninstall any instances of qv06 like toolbars and such.
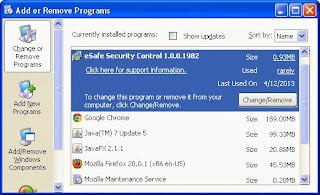
qv06.com removal

Once you have done this then follow the directions below to remove it from your home page within your preferred browser, if you use more than one browser then repeat the steps below on all browsers.

Internet Explorer

Step 1.Click the right mouse button over Internet Explorer's shortcut (it should be on your Desktop). Here, choose 'Properties', locate 'Target field' and eliminate all text, which is related to Qvo6 and is entered after "C:\Program Files\Internet Explorer\iexplore.exe".
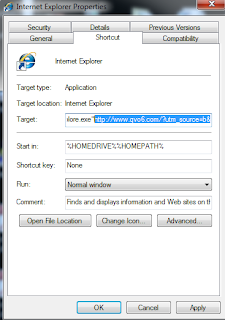
qv06.com removal

Step 2. Open Internet Explorer, go ‘Tools‘ -> ”Manage Add-ons’ -> ‘Toolbars and Extensions’. Here, look for Qvo6 and click 'uninstall'. Now open IE -> Tools -> Internet Option -> General tab. Enter Google or other address to make it the default start page.

If you have any shortcuts pinned to the taskbar along the bottom then you will need to un-pin them by right clicking and then reopen internet explorer from the start menu or desktop and then right click on the icon and select Re pin this Program to the Task bar.


Google Chrome

Step 1. Open your browser, go to Google Chrome Settings, in the “On Startup” area, please click on Set pages.

qv06.com removal

You will now see Startup pages, in this page, click on the X button to delete Qvo6.com.
qv06.com removal

Once Done click on ok and you will return back to the settings page.

Step 2. Click on the Appearance area, and then click Change. 

qv06.com removal

Remove qvo6.com from the Open this page tab and then Select Use the New Tab page and click OK to save changes

Step 3. Move down to the Search section and click on the manage search engines button.

qv06.com removal

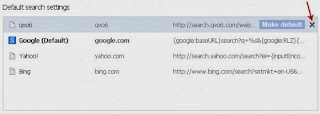
Select Google or any other search engine you like from the list and make it your default search engine then select Qvo6 from the list and remove it by clicking the "X" mark as shown in the image below.

qv06.com removal

Step 4. Close down Chrome and then find the shortcut either on your desktop or on the start menu and right click and select properties, In Shortcut tab, please remove "http://www.qvo6.com...." from the Target field and click OK to save changes. 
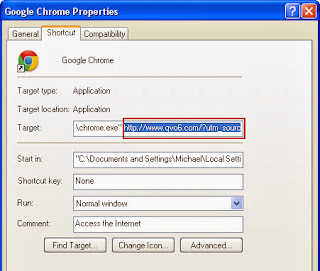
qv06.com removal

Once you have clicked on OK and the properties window has disappeared you may need to re pin your shortcut on the task bar like above for internet explorer, simply open chrome again and then right click on the chrome icon on the task bar and select Pin this Program to Task bar.

Firefox

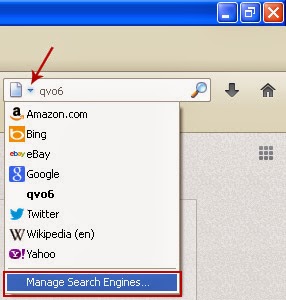
Step 1. Click on the Qvo6 search icon as shown in the image below and select Manage Search Engines.
qv06.com removal

Step 2. Select Qvo6 from the list and click Remove to remove it. Click OK to save changes.
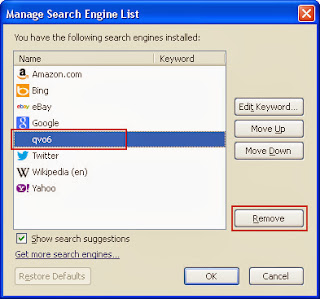
qv06.com removal

Step 3. Find the Firefox shortcut on your desktop on on the start menu and right-click on it.

In Shortcut tab and remove "http://www.qvo6.com...." from the Target field and click OK to save changes. 
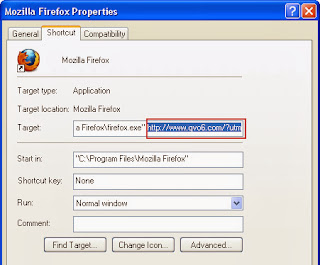
qv06.com removal

Once you have clicked no OK you may need to un pin and re pin your shortcut to the task bar again simply find your shortcut and open it and then right click and select Pin this Program to Task bar.

If you are still experiecning issues with firefox you can also reset your web browser to original state. To use that, please follow steps below: 


1. At the top of the Firefox window, click the Firefox button; go over to the Help sub-menu and select Troubleshooting Information.

2 Click the Reset Firefox button in the upper-right corner of the Troubleshooting Information page.

Firefox will close and be reset. All data keep in Firefox will be removed, please save your important date before you move on. 

Once this has been completed i would also run another scan with your anti malware program to double make sure that it is completely gone

Thursday 5 September 2013

Adobe Error 213-19 Licensing Issues

Adobe Error 213-19

Adobe Error 213-19 is a Licensing error which will not allow you to start your adobe application wether it be photoshop to acrobat, follow the steps below to fix the issue, but please have your legitimate serial number to hand as you will need to input this in again to re setup the activation.

Log in to your Windows computer as an Administrator.
Click the following link to download the patch file:
*Adobe 213.xx Licensing Fix Tool.zip
When prompted "Do you want to open or save this file?,” click Open.


Extract the file. The location varies depending on your operating system and the utility.
Double-click the extracted LicFix_21319.exe file. If the file executes successfully, Command Prompt closes automatically.
Launch Adobe App.
Solution 2: Install the patch for Acrobat using Command Prompt (Windows only).

1. Run the Command Prompt as an Administrator.
2. Navigate to the location of the extracted hot fix in Solution 1 (Step 4).
3. Type LicFix_21319.exe to execute it.
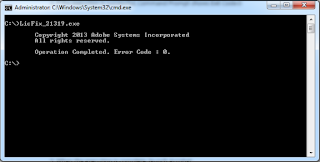
4. If the execution is successful, Command Prompt shows Exit Code:0
Run the Command Prompt as an Administrator.
Navigate to the location of the extracted hot fix in Solution 1 (Step 4).
Type LicFix_21319.exe to run it. If the file runs successfully, Command Prompt shows Exit Code:0.
Error 213-19 CMD

Solution 3: Make sure that your user account has full permissions (Read and Write).

Windows 8
C:\ProgramData\Adobe\Slstore
Or, C:\ProgramData\Adobe

Windows 7, Vista
C:\ProgramData\Adobe\Slstore
Or, C:\ProgramData\Adobe

Windows XP
C:\Documents and Settings\All Users\Application Data\Adobe\SLStore
Or, C:\Documents and Settings\All Users\Application Data\Adobe

Mac OS X 10.5.x or 10.6.x
[Home]/Library/Application Support/Adobe/SLStore
Or, [Home]/Library/Application Support/Adobe