Thursday 3 December 2015

Windows 10 VPN using remote gateway FIX !!

I recently noticed an issue with windows 10 Pro when i was trying to connect to my vpn from home, i wanted to surf the internet but not use the remote gateway of the VPN connection, normally in previous versions of windows you could get into the TCPIP settings and tick the magic little box that uses the local gateway, so off i went and tried to do the same thing in windows 10 and i was unable to accomplish my task due to the fact that the properties button would not work for me when i tried to click on it. This is a known issue but it hasn't been fixed as of yet so a permanent fix for this is to do all the required changes in Powershell.


First things first you need to open up Powershell for those of you that haven't used this before its similar in the look and feel to a command prompt but a lot more powerful in what it can do, simply search for Powershell in your search box and click on Powershell when the search appears.
when in Powershell type or copy and paste the following command and press enter.

Get-VpnConnection

This will then show you the information about your VPN connection as per the image below
you will see that next to the option SplitTunneling it is set to False, this is what we need to change.


The next command you need to input into Powershell is below and also press enter to make the change.
 
Set-VpnConnection "Superkev VPN" -SplitTunneling 1

Change Superkev VPN to the name of your vpn (including the quotes) from the information in the first Powershell results window, as per image below.
To Confirm that the change has taken effect run the first command again and check that next to the SplitTunneling option that is says True as per image below.
That is all you need to do now you can be connected to your VPN and use the local internet gateway to surf away.


Sunday 13 September 2015

How to use Windows Photo Viewer in Windows 10

Enable Windows Photo Viewer - Windows 10

Its been a while since i have blogged, so windows 10 is now upon us and as the normal IT geek that i am i decided to update all the computers in the house.

I have been pretty happy with it so far and as i am running a domain in the house i made sure that i connected them to my domain as i am running Windows 10 Pro, this was simple and works as expected, one thing that i have set by default by group policy was to turn of the very annoying UAC (User Account Control) as i want to be able to run my programs and other apps without being asked do i want to do this, are you sure you want to do this.

Now this has caused me a slight issue when it comes to viewing images, as the bulit in Photos app will not run whilst UAC is disabled much like all of the Windows Store Apps. I didn't really like it much anyway i much prefer the older Windows Photo Viewer, so i set out finding a way to get this app working so i could view my pictures again.

Follow the steps below and you will have it back working in no time at all.

Step 1.

Open up Regedit, click on start or just type regedit in the search box at the bottom of the screen, once it shows you the regedit icon just click on it.

Step 2.

Browse to the following registry key

HKEY_LOCAL_MACHINE\SOFTWARE\Microsoft\Windows Photo Viewer\Capabilities\FileAssociations

You will need to add the following entries as string values, dont worry that they all have .Tiff at the end this is normal and is not related to the image file type .TIF

.bmp PhotoViewer.FileAssoc.Tiff
.dib PhotoViewer.FileAssoc.Tiff
.gif PhotoViewer.FileAssoc.Tiff
.jfif PhotoViewer.FileAssoc.Tiff
.jpe PhotoViewer.FileAssoc.Tiff
.jpeg PhotoViewer.FileAssoc.Tiff
.jpg PhotoViewer.FileAssoc.Tiff
.jxr PhotoViewer.FileAssoc.Tiff
.png PhotoViewer.FileAssoc.Tiff

Regedit

Step 3.

Now open the Set Default Programs by typing settings in the search box next to the start button then click on settings.

Defaults

Now type defaults and then click on the Default app Settings, scroll down to the bottom and click on Set Defaults By app.
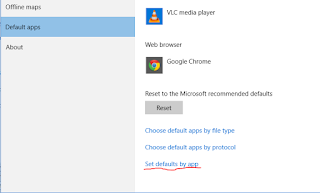
Defaults

Step 4.

Now scroll down to Windows Photo Viewer and click on Set this program as default, then click on choose defaults for this program, you can now select all of the file formats we put in regedit earlier and click on save.

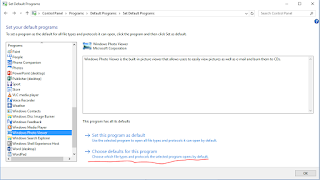
Defaults 3

Defaults 4

Thats all you need to do, now double click on an image file and it will either open straight up in Windows Photo Viewer or you will get the option to select Windows Photo Viewer and you can tick the box that says Always use this app to open files.
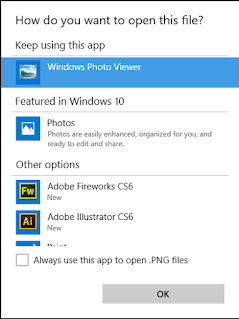
Defaults 5


Tuesday 3 February 2015

iPhone Exchange Emails not Syncing

If you have ever used your iPhone/iPad to conencto to an enterprise exchange account you will probably of come accross this issue, or atleast your IT person will have.

Since Exchange 2007 there has been a bug where the permissions are not working as they should do, and you have to manually set inheritable permissions on the Exchange servers object in the User's Security settings on their AD Account.
To do this follow the steps below.

Go to your Domina Controller and open up Active Directory Users and Computers.
Click on View and then make sure Advanced Features is ticked as per the image below.


Then scroll down to where your users are located and fine the relevant user, right click on them and then go to properties, and then to the security tab.


Once you are in the click on the Advanced button near the bottom right corner.


Once you have opened it up you need to select Exchange Servers and then put a tick in the "Include Inheritable Permissions" box and then click on OK.

Leave it a few minutes then your emails should start to come through, this is a bug in all versions of Exchange from 2007 upwards and is still yet to be fixed.

Monday 2 February 2015

ICMPv6 Broadcast Storm - Wireshark Network Diagnostics


Wireshark Netowrk Diagnostics - ICMPv6 Broadcast Storm When i got back to work after the wonderful xmas break i made a start on installing 50 new desktop computers, so i fired up my imaging system (MDT + WDS) and imaged all of the computers no problems.
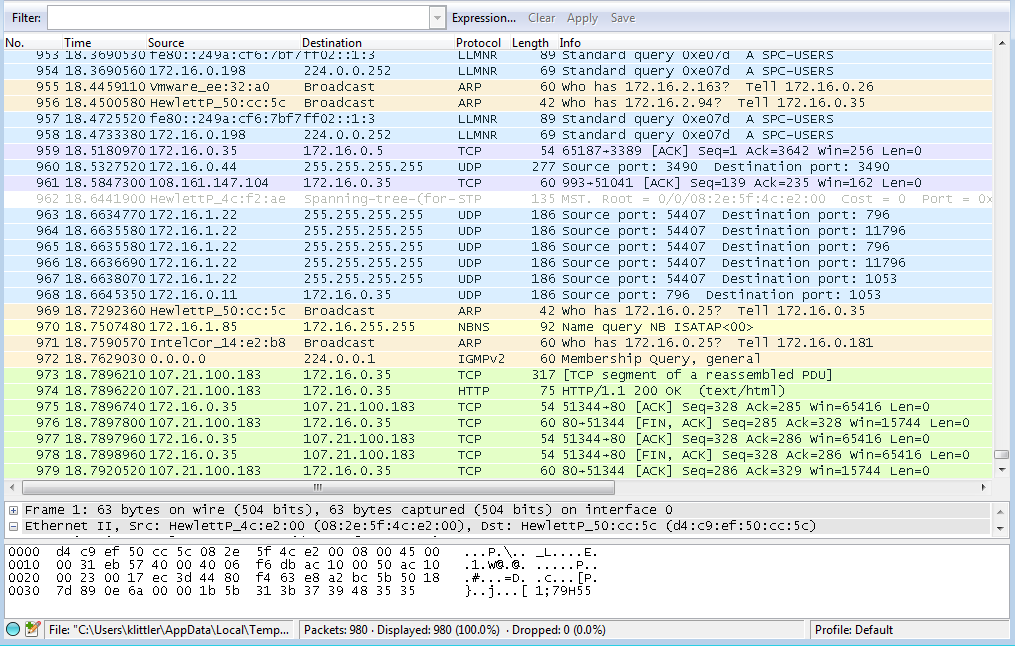
Not to long after i had finished my imaging i noticed that the network was slowly but surely grinding to a halt, all my servers kept dropping out, the wireless controller was having a fit and then pretty much everything was stuffed, i decided i needed to get wireshark running to see what was going on and straight away i was confronted with the following image below.
Wireshark
Lots of RED NOOOOOOOOOOOOOOO if you have ever used wireshark before you will know that seeing this much red is not a good thing, after 1 minute of packet capturing there was over 1 million packets, the network was literally brought to its knees.
When i stopped the capture i clicked on one of the red lines and drilled down, i found the mac address of the offending computer and then went onto the dhcp server to try to find it.
After a short while of searching i found it in the system and to my surprise it was one of the new computers i had imaged earlier in the week.
I then went on to the net to check out why it was causing issues, the network card in the new computers was the intel i217-lm, the driver i was using was the most recent one from the HP website so this should be fine right... ummmm no that would appear not to be the case, i found that the specific driver which was 12.10.30.5890 dated 16/12/2013 has issues whilst the computer is in hibernation, sending out literally millions of ipv6 requests and when you have more than one of these suckers thats when the broadcast storm starts up.
We dont use IPV6 in our network so i started the process of disabling all of the IPV6 settings on the network card, but the issue still remained so i then headed over to the intel website and found out that the driver on the HP website was sooooooo out of date, i downloaded the latest driver from the intel website and proceeded to install it on all of the other computers, once i had finished installing the driver and changed the remaining wake on lan and IPV6 settings i ran another scan in wireshark and the proof was in the pudding as per the picture below.
Wireshark 2
After a few reboots of the switches everything was operating back at a normal pace.