Thursday 27 September 2012

Stop Automatic eBay Seller Fees taken by paypal

Remove eBay's Automatic Payments from Paypal

If like me you like to sell the odd thing or two on eBay  you will have noticed that recently eBay changed their policies and you now have to have Automatic payment method setup before you can list items for sale.

This can be a pain as the fees automatically come out of your associated bank account or off your debit/credit card at random times and you may not have the funds available at that time, you still have to put this information in there before it will allow you to list your items, but who is to say that you cant remove that out of Paypal after you have listed your items.

I don't mind having to pay my seller fees to eBay using Paypal but i would like to pay them when it suits me and being paid monthly usually means that i get close to the red line come the end of the month and that usually when eBay decides they want their money, gone have the old days when they would email you an invoice and tell you when the money had to be paid by, they just up and take the money when they feel like it.

To get around this one its simple we just need to remove the Automatic Payment from with in paypal but i hear you speak where the hell is it !!! it took me a while to figure it out and eventually i found where it was, follow the steps below and you will soon be free of this predicament.

Login to the Paypal website with your details and when it has loaded into "My Account" click on the Profile option on the right hand side of the screen like the image below.

When you are in the Profile section you have four options on the left hand side, My Personal Info, My Money, My Settings and My Selling Tools, we want to be on the My Money tab and then click on Update on the My pre-approved payments option as per the image below.

In there you will see eBay International AG and the status to the side of it will say Active go ahead and click on the eBay International AG, once it has loaded up you will see that the status says active and there is a Cancel button. click on cancel and this will then cancel the automatic payment you will also receive and email from Paypal telling you that you have just cancelled the payment agreement.

You can now relax knowing that eBay or Paypal will not be taking any money out of your account until you are ready to pay them yourself, please note that you wont be able to list items again until you re-enter the details back into eBay, but if you do not sell a lot of items then this wont be a big issue.

Mapping Network Drive with Visual Basic Script

Mapping Network Drive with Visual Basic Script Following on from the Visual basic script for adding printers, this time i will give you an example of how to map network shares as drives.
This is pretty similar to the Print Script and uses the same formatting, the following example maps two drives R and S drives if you want to add more then you will need to change the script accordingly.
The script starts out with the (On Error Resume Next) again like the printer script so that it will move onto the next line of code if there is any errors
On Error Resume Next 
Set objSysInfo = CreateObject("ADSystemInfo") 
Set objNetwork = CreateObject("Wscript.Network") 
'removes mapped drive R 
objNetwork.RemoveNetworkDrive "R:", True, True 
'removes mapped drive S 
objNetwork.RemoveNetworkDrive "S:", True, True 
'creates maped drive R 
objNetwork.MapNetworkDrive "R:", "\\Server\Share1" 
'creates maped drive S 
objNetwork.MapNetworkDrive "S:", "\\Server\Share2" 
This script will remove the two drives before it adds them as with the printer script, un like the printer script it still works even if the drives are not already mapped, if they are already there it will remove and re-add them.
You can simply copy and past this script and change it to suit your needs this also needs to be saved with the file extension of *.vbs (mapdrives.vbs) and can be used with a Group Policy or can be double clicked and run.

Adding Printers with a Visual Basic Script

Adding Printers with a Visual Basic Script If you are a Network Administrator or work in a IT Role and it is your responsibility to install printers and maintain the network then this script will save you lots of time, if you take care of more than 10 computers you will know that having to install the same thing on each one can be pretty laborious, if you are running a Windows Server environment with a domain, you can use group policies to deploy your printers, Windows Server 2008 has a Deployed Printers option built in but can be sometimes unreliable, if you find that this is the case then you can use my script to deploy your printers.
We start out by opening notepad or any other txt file editor, on the first line we want to put in the following without the brackets,
(on error resume next) 
this tells the program when you encounter an error just continue at the next line. The next line we use the
Set objNetwork = CreateObject("WScript.Network") 

WScript.Network is a scripting object that provides methods and properties that allow for manipulation of network objects.
The next line you add in the printer
objNetwork.AddWindowsPrinterConnection "\\Server\Printer Shared Name"
after it has added the printer you will need to set it as the Default printer if you have more than one printer installed
objNetwork.SetDefaultPrinter "\\Server\Printer Shared Name"

So your finished script will look like this.
on error resume next
Set objNetwork = CreateObject("WScript.Network")
objNetwork.AddWindowsPrinterConnection "\\Server\Printer Shared Name"
objNetwork.SetDefaultPrinter "\\Server\Printer Shared Name"
Save this with the file extension of *.vbs for example addprinter.vbs and then you can use it as a script in the logon process with a group policy, or if you simply double click on the file it will install the printer for you, if you are deploying this with group policy you will want to remove it after successful installation as it will not work the second time around, unless you change some of the parameters, as it will already be installed it will give you an error, the change to the script that is required is below
'objNetwork.RemovePrinterConnection "\\Server\Printer Shared Name"
This goes above the objNetwork.AddWindowsPrinterConnection "\\Server\Printer Shared Name" line in the script so your script will now look like this below.

on error resume next
Set objNetwork = CreateObject("WScript.Network")
'objNetwork.RemovePrinterConnection "\\Server\Printer Shared Name"
objNetwork.AddWindowsPrinterConnection "\\Server\Printer Shared Name"
objNetwork.SetDefaultPrinter "\\Server\Printer Shared Name"

Wednesday 26 September 2012

Setting up a Cisco Route-map - Local LAN Access on VPN

Setting up a Cisco Route-map - Local LAN Access on VPN I recently setup a Cisco VPN for me to access my server at home remotely this was great but i realized that when i was connected i could not get on to the server with RDP or VNC, i had already set these up from a external connection where the VPN wasnt accessible by putting in simple port forwarding rules.
What i wanted to achieve was to be connected to the VPN and use my services that i could do from my port forwarding rules.
I had to do the following to get this working.
Here are my original rules to allow access from external connections without the VPN.
ip nat inside source static tcp 192.168.2.120 5900 interface Dialer0 
ip nat inside source static tcp 192.168.2.120 5800 interface Dialer0
ip nat inside source static tcp 192.168.2.120 3389 interface Dialer0

I realized that these rules were not going to work whilst on the VPN because it was trying to route through the Dialer0 interface, i needed to setup a route-map, first things first i had to create a new ACL which i numbered 120, then permit the ip range my range for my VPN connection was 192.168.5.0 0.0.0.255 so the access-list would look like this,
access-list 120 permit ip 192.168.2.0 0.0.0.255 192.168.5.0 0.0.0.255

I then moved onto setting up the route-map i named it Bypass-NAT, type the following into your rotuer

route-map Bypass-NAT deny 10
match ip address 120
route-map Bypass-NAT permit 20

You can copy and paste these lines of code but only 1 line at a time, now that you have the ACL in place and also the route-map you will need to re write your rules for you port forwarding, so delete the old rules by typing the following,
no ip nat inside source static tcp 192.168.2.120 5900 interface Dialer0 
no ip nat inside source static tcp 192.168.2.120 5800 interface Dialer0
no ip nat inside source static tcp 192.168.2.120 3389 interface Dialer0

when you have done this write back your config then put in the new port forwarding rules like below

ip nat inside source static tcp 192.168.2.120 5800 YOUR.PUBLIC.IP 5800 route-map Bypass-NAT extendable
ip nat inside source static tcp 192.168.2.120 5900  YOUR.PUBLIC.IP  5900 route-map Bypass-NAT extendable
ip nat inside source static tcp 192.168.2.120 3389  YOUR.PUBLIC.IP 3389 route-map Bypass-NAT extendable

Once again write back your config and try to RDP from external and test, then connect your Cisco VPN Client and try to RDP to the private IP, everything should be working fine.


Tuesday 25 September 2012

Automating your Sharepoint 2010 Backups with PowerShell

Automating SharePoint 2012 Backups with Powershell and Scripts

If like me your company uses SharePoint 2010 and have multiple sites, you will know that backups can be a pain, i have had lots of issues in the past getting SharePoint to backup correctly using a variety of different third party applications, all of which required me to setup a new user with all the required access rights to the sites and so on and so forth.

I have also used the built in backup features within the Central Administration Site and although this works perfectly its a pain  to be going in there everyday to do the backups of each site and also the whole farm. I decided that it would be much easier and simpler to just use the built in Powershell and write a few scripts to do this for me automatically.

I first of all thought of how i wanted to backup the sites and where to, i did much reading on the internet and mainly the MSDN site reading through the CMDlets that can be used within the SharePoint Powershell.

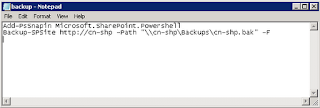
So here are the scripts that i ended up writing to get the job done, first of all create a folder on the C Drive of your SharePoint server called Scripts, Next open up notepad or a simple txt file editor the first line of the script needs to call the SharePoint Powershell snap in as below.

"Add-PsSnapin Microsoft.SharePoint.Powershell"
the second line has to have at the beginning the CMDlet that is to be used so in our case would be 
(Backup-SPSite) the followed by the site address to be backed up (http://cn-shp) then after this we need to put in the path of the backup location followed by the file name of the backup file  (-Path "\\Server\Backup\cn-shp.bak") then followed by the forced command which is (-F) 
so our script will look like the image below 

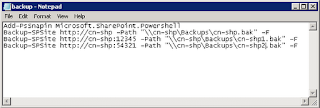
If you have more than one site to backup then you can add the rest of the script in place like the image below following the same rules as above.

When you have finished make sure to save the file as backup.ps1, so go to File > Save As, then put in the name of Backup.ps1, you can change the file type by changing the drop down in notepad in the bottom right corner when saving as the image below.


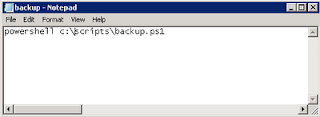
Now that you have your Powershell script written time to move onto the batch script to run the Powershell from a scheduled task, open up notepad once again, In the notepad file simply type,

(powershell c:\scripts\backup.ps1) you will need to also save this one the same way as above but this time it needs to be a batch file with the file extension of .bat you can also call this backup if you would like to as i have done on my example, save it to C:\Scripts\Backup.bat .

Now to add it as a Scheduled Task to run nightly, if your running windows server 2008 click on Start then go to Administrative Tools and then to Task Scheduler in server 2003, click on Start then go to Control Panel then to Scheduled Tasks.

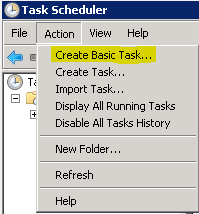
In Server 2008 Click on Action at the top and then Create Basic Task

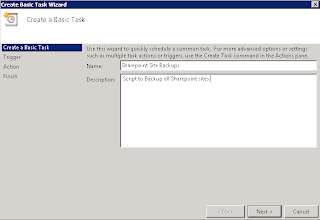
In the Create Basic Task Wizard give you task a name i have called mine Sharepoint Site Backups but you can call it what ever you want to suit your needs, you can also put in a brief description if you want to also.
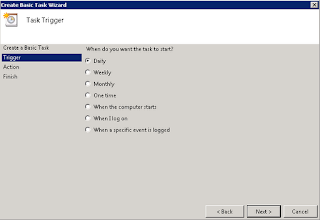
Once you have filled out the information click on the Next button, choose the action so we want to do a daily backup so select the Daily radio button and click on the Next button.

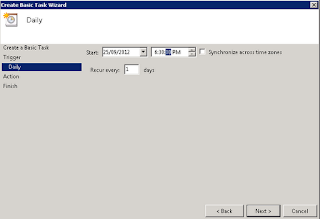
you will then be asked to put in the time you want the backup to start and how often you want it to recur the default is 1 Days, then click the Next button to continue.

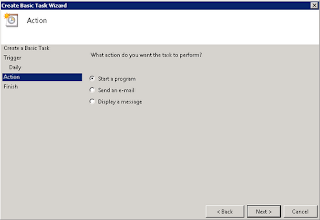
On the Action page you want to select the Start a Program radio button as we want it to load our batch file up, then click on the Next button. 

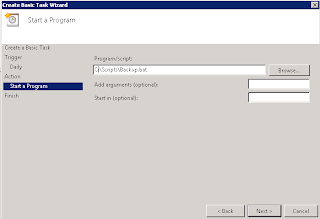
On the Start a Program menu click on the browse button and browse to C:\Scripts\ and select your Backup.bat script leave the Add Arguments and Start in both blank and click on the Next button.
Once you have done this you can click on the Finish button and you have set your scripts in place to run every night at 6:30PM

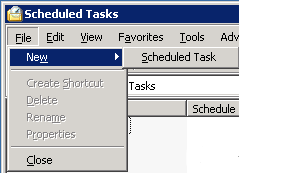
For Server 2003 Click on File and the New > Scheduled Task
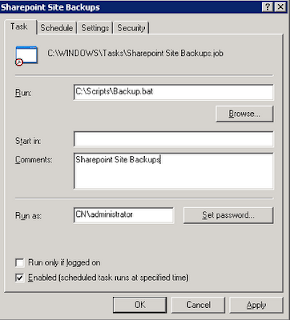
By Default it creates the task and you can change the name of it like the image below, once you have done this double click in the task itself and the you can change the details. 

Click on the Browse button and go to C:\Scripts\ and select the Backup.bat file and click on OK, put in the a Comment if you want to also and select the user that you want to run the script, put a tick in the Enabled box then move on to the Schedule Tab at the top.
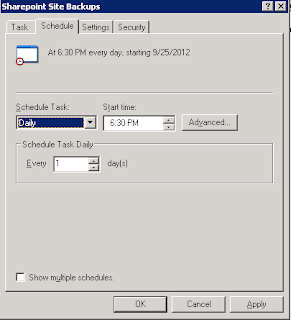
On the Schedule tab choose how often you want to run the task so i chose Daily and also the time in which to run it which is 6:30PM, leave the default of Every 1 Day and click on the OK button to finalize the task.
Your Backups will now run every evening and will be saved in to the specified folder that you put in your script, no i copy my backups to a folder which is shared on the same server so if you need to copy these into  another location once they have finished backing up for instance to a external backup drive or such then you can use the following script top then copy them to another location.

You will also want to automate the running of this script also but not until the other backups have finished i leave roughly 2 hours for my backups to finish before i have Task Scheduler run the script, this script basically work by copying the contents of the folder Backups on the E:\ Drive which is shared as (\\cn-shp\Backups) to a network drive Z:\ which is a Backup USB drive that is taken off site the extra characters on the end of the Z:\ tell xcopy to create a folder named with the date so that it does not overwrite and existing backups, when the script has then finished copying the files it will remove the entire folder and then recreate it ready for the next backup the following day, you can however change the feature of this script to suit your needs.

The Raspberry Pi - HTPC with XBMC

Raspberry Pi and Home Theatre setup

Yesterday i took delivery of a Raspberry Pi Model B, for those of you that dont know, The Raspberry Pi is a credit card sized single-board computer developed in the UK by the Raspberry Pi Foundation with the intention of stimulating the teaching of basic computer science in schools.


I bought mine from Element14 as a development computer and also to see how cheap i could build a working HTPC/Media player replacement i currently have a Apple TV and a Windows PC plugged into my 3D tv in the living room, this currently takes up space and power, as i am trying to reduce my power bills and save money i thought that i would try to bring down the power consumption by trying out the Raspberry Pi.

So what do you need to get up and running.

1x Raspberry Pi
1x Micro Usb cable or a 5v power pack with micro usb end 
1x SDHC or Micro SD card with full size adaptor
1x HDMI or RCA cable to connect to a TV or monitor
1x Usb keyboard and mouse or media center remote
1x Raspberry Pi Distro

I had a quick read on the Raspberry Pi website and the quick start guide and chose my OS as i mainly wanted this to be used for media, So i chose Raspbmc which is based on Debian and XBMC created by Sam Nazarko, this is a very clean and fast distro and is relativly easy to install, this is still in prodcution and there are nightly builds available at the moment until the final version is released.

Installation Via Windows

Its very easy to install just download the Windows installer from here, its compatiable with wondows 2000 upto windows 7, download it and extract the files to a folder on your computer.

Open up the folder and double click on the Installer.exe, you will be presented with an error message, just telling you that the Utility erases all data on your device that is selected and by using the tool you accept that Raspbmc takes no responsability for data loss. Click on the OK button and the program will load.

When it has loaded it will look like the image below 

Select your SD card then click on the Install button ( you do require and active internet connection for this as it needs to download content from the raspbmc website) when this has done you will be prompted to finish the installation on the Raspberry Pi itself and you also require and wired LAN connection with internet access to finish off the install wireless will not work for this.

Once you have the Raspberry Pi plugged in and turned on it will start the install, this takes between 20 - 45 mins depending on your speed of your broadband connection, best bet it to go and grab a coffee or a beer and leaving it to install.

Once the installer has finished it will auto boot straight into XBMC itself, this is the basic installation finished, you can now power it down and take it back to the tv unless you are using the Pi where you have LAN access, i had to go into my office whnere my router was to get my LAN/Internet connection.

XBMC itself starts up and is functional and plays media that i have put on the memory card itself, and it will play media over the network from my NAS but only with the LAN connection which i dont have where my TV is only in the office, you can however play media from any USB source you might have so a portable hard drive or a portable desktop hard drive with a power source.

If you are wanting to use a usb wireless adaptor then you will need to find one that is compatiable with debian which there are lots to choose from, i am personally using the wireless card that i had plugged into the HTPC ( Linksys AE1000 ) so there was no extra cost, i need to install the drivers and create the conf file for my wireless encryption settings then it will connect automatically which i will have to find on the internet first.

You can also go into the settings to install new apps and sources into your raspbmc installation but more so you can update the verion of raspbmc right from the menu itself as mentioned there are currently nightly builds being written so if you want to keep on top of the releases or just to try out the new features that are implemented then you can get them from here, this is also good if your installation goes a bit weird with the new changes you can simply just roll back to the last known working release and wait until the new release has been fixed.

In my next update i will be adding my wireless drivers and settings so that i can use the unit on my wireless network and also adding some extra add-ons like the ability to use your iPhone as a remote and extra apps like YouTube, AirPlay and uTorrent.

Monday 24 September 2012

5 ways to avoid data overuse on 4G LTE

5 ways to avoid data overuse on 4G LTE

Now that the iPhone 5 has been released there will be lots and lots of people that will be going over their data on their plans, to avoid this the ACMA have released a post, Five ways to avoid data overuse and bill shock from new 4G LTE phones

The Australian Communications and Media Authority (ACMA) has released an easy-to-use infographic, showing five ways to avoid overuse and bill shock, when using a phone on a high speed 4G/LTE mobile network.

Overseas research suggests users of high-speed 4G/LTE networks could use more data than they’re used to and may experience bill shock as a result.

If you follow the tips in the above picture you will be fine and not go over your plan and costing yourself heaps of extra $$$ on you next bill.

Google TV hits Australian shores

Google TV comes to Australia

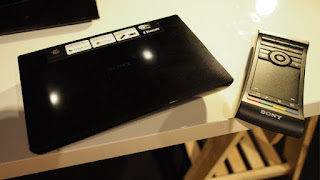
Google TV is finally available to buy in  Australia. After much bundling and exclusive product periods, the Google TV from Sony is now available to purchase, How much is it and where can you get it?

The Google TV from Sony is available on the Sony Website and also at Sony Centers for $299. From the 1st October, you will be able to purchase it from Harvey Norman and other associated retailers which should also be $299.


The unit boasts the ability to turn any TV into a smart TV. It certainly does that, but for $299 what exactly do you get for your money and will it be a competitor to the Apple TV, being 3 times the price.

Google Tv

In the USA there are lots of features to use like Netflix, Hulu and HBO Go, but as the latter two are american only services these wont be available to us here in Australia, we will be getting Chrome, YouTube, Google Play and Sony's Entertainment Network, we can also add ABC and Quickflix but these have to be installed manually they do not come pre-installed.

Google Tv

If you dont own an Amplifier then you are going to be a little disappointed as this means that you cant plug the Google TV unit into your set-top box for an integrated experience, you have to plug it directly into another HDMI port to use.

I personally cant see this doing very well on the market even for the android lovers there simply isnt enough content for it to survive, especially when you can pick up an Apple TV for $99 and have all the online streaming capabilities of the Apple Store and also if Jailbroken can unleash a whole new world of media at your fingertips.


What's in the box

It comes with 8GB worth of internal storage and plays most of the formats you could ask for, including .mkv, .avi, MPEG-1, MPEG-2 and MPEG-4, .flv and .mov. It’s got two USB inputs, an optical audio output, Bluetooth, ethernet port, Wi-Fi and one HDMI input.

It’s controlled by a double-sided remote that connects via Bluetooth and features both a full, backlit QWERTY keyboard and a multi-touch trackpad. The remote can also act as a controller for your other home entertainment devices thanks to an IR blaster built into the set-top box.

Google Tv Google Tv

Telstra 4G LTE Speed Tests

Testra 4G LTE Speed Tests

I have had my iPhone 5 all of 2 days and already I'm cranking out the speed tests, the coverage of the Telstra 4G LTE (Long Term Evolution) network is already in all major cities accross Australia and all major airports.

I'm in Townsville and although the covereage does not quite reach my house, I can get 1 bar sometimes depending where I am in the house.

I have conducted a number of speed tests to show how well the network is working and also what I think can be expected in the future for this network.

Distance from CBD Download Speed Upload Speed Latency (Ping) Server Signal Strength
0 KM 16645 20499 69 Brisbane Full 5 Bar
0 KM 25312 18794 68 Brisbane Full 5 Bar
0 KM 15070 19954 69 Brisbane Full 5 Bar
1 KM 16600 22990 64 Brisbane 4 Bar
1 KM 15131 16307 68 Brisbane 4 Bar
1 KM 25846 20216 69 Brisbane 4 Bar
1 KM 16726 10523 64 Brisbane 3 Bar
1 KM 26970 20413 69 Brisbane 3 Bar
1 KM 28679 16720 68 Brisbane 3 Bar
1 KM 22651 13477 61 Brisbane 3 Bar
1 KM 26449 17927 69 Brisbane 3 Bar
1 KM 27467 23767 68 Brisbane 3 Bar
1 KM 16276 6287 68 Brisbane 3 Bar
1 KM 25985 11853 69 Brisbane 3 Bar
1 KM 25091 5787 69 Brisbane 3 Bar
1 KM 28544 17754 69 Brisbane 3 Bar
1 KM 12411 31140 49 Brisbane 3 Bar
2 KM 15672 12928 49 Brisbane 2 Bar
2 KM 11764 12977 48 Brisbane 2 Bar
3 KM 9504 5620 49 Brisbane 2 Bar
3 KM 6213 2843 49 Brisbane 2 Bar
4 KM 23850 4339 47 Brisbane 3 Bar
4 KM 9494 1525 88 Brisbane 2 Bar

Speeds above shown in *KBPS

So we can see from the results that the speeds vary from the high 20's to the low teens in the actual city itself, and also some high and low results away from the city this was in a shopping center though which I think may have a antenna on the roof. From what I can tell though I get the best speed results when I only have 3 bars of reception which is very strange to me as you would expect to see the best results with the highest amount of reception.

Some tests were also taken whilst I was walking in the street which will have also affected the results but not in the way that I expected, as i was going into an area with more reception, very confusing. I have checked the Telstra 4G Coverage Map Here and I should be getting a good amount of speed from where I am situated but still only getting approx half of what I could be, and it appears that the majority of the coverage is out at sea ??? This will more than likely be for the residents of Magnetic Island but even so its still wierd that I would get better coverage on a boat out at sea than on land.

4G Coverage Map

So what can we expect of the 4G LTE Network in the future? Well just as the 3G network started out really fast in comparison, the 4G LTE network will do the same as more and more people jump on the band wagon and get Mobile Broadband Sticks and 4G LTE capable phones. The network will slow down considerably so the results above whilst seem pretty fast now in 6 - 12 months will more than likely be a lot slower especially on the upload side of things anyway.

So in summary so far I am pretty impressed with the netowrk and the speed of surfing and downloading apps. Lets just hope that the speeds keep up and also that the coverage gets better outside of the city, currently the plans are pretty expensive for the data that you get on the Telstra network but as more and more people conenct up the cost will hopefully reduce and more data will be made available on the network.

How to Turn Off iPhone 5 4G LTE

How to Turn Off iPhone 5 4G LTE

If like me you can only get the 4G LTE reception when you are in the city or you are just on the outskirts of the 4G LTE zone then you will notice that your phone is constantly flipping between 3G and 4G LTE thus using lots of battery.

To Disable / Re-enable 4G LTE on your iPhone 5 simply follow the instructions below.

Tap on Settings

Go to General

The tap onto Mobile Data or Cellular Depending where you are in the world.

Then simpy move the "Enable LTE" slider to either on or off.