Tuesday 24 September 2013

Removal of qv06.com Browser Hijacker

Removing qv06.com Browser Hijacker

I recently had to remove this for a member of my staff who unfortunately got hit with this one and it was a pain in the bum to remove, every time you change the homepage and close and reopen the browser it would reappear again.
qv06.com removal
To remove this follow the steps below and you should be free of this hijacker for good.

First off i would run an anti malware program such as malwarebytes or combofix to eliminate any hidden files that it may have downloaded without your knowledge.

Then i would also go in to your programs and features within control panel and uninstall any instances of qv06 like toolbars and such.
qv06.com removal

Once you have done this then follow the directions below to remove it from your home page within your preferred browser, if you use more than one browser then repeat the steps below on all browsers.

Internet Explorer

Step 1.Click the right mouse button over Internet Explorer's shortcut (it should be on your Desktop). Here, choose 'Properties', locate 'Target field' and eliminate all text, which is related to Qvo6 and is entered after "C:\Program Files\Internet Explorer\iexplore.exe".
qv06.com removal

Step 2. Open Internet Explorer, go ‘Tools‘ -> ”Manage Add-ons’ -> ‘Toolbars and Extensions’. Here, look for Qvo6 and click 'uninstall'. Now open IE -> Tools -> Internet Option -> General tab. Enter Google or other address to make it the default start page.

If you have any shortcuts pinned to the taskbar along the bottom then you will need to un-pin them by right clicking and then reopen internet explorer from the start menu or desktop and then right click on the icon and select Re pin this Program to the Task bar.


Google Chrome

Step 1. Open your browser, go to Google Chrome Settings, in the “On Startup” area, please click on Set pages.

qv06.com removal

You will now see Startup pages, in this page, click on the X button to delete Qvo6.com.

qv06.com removal

Once Done click on ok and you will return back to the settings page.

Step 2. Click on the Appearance area, and then click Change. 

qv06.com removal

Remove qvo6.com from the Open this page tab and then Select Use the New Tab page and click OK to save changes

Step 3. Move down to the Search section and click on the manage search engines button.

qv06.com removal

Select Google or any other search engine you like from the list and make it your default search engine then select Qvo6 from the list and remove it by clicking the "X" mark as shown in the image below.

qv06.com removal

Step 4. Close down Chrome and then find the shortcut either on your desktop or on the start menu and right click and select properties, In Shortcut tab, please remove "http://www.qvo6.com...." from the Target field and click OK to save changes. 

qv06.com removal

Once you have clicked on OK and the properties window has disappeared you may need to re pin your shortcut on the task bar like above for internet explorer, simply open chrome again and then right click on the chrome icon on the task bar and select Pin this Program to Task bar.
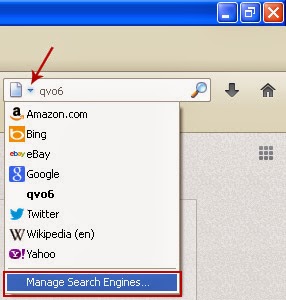
Firefox

Step 1. Click on the Qvo6 search icon as shown in the image below and select Manage Search Engines.

qv06.com removal

Step 2. Select Qvo6 from the list and click Remove to remove it. Click OK to save changes.

qv06.com removal

Step 3. Find the Firefox shortcut on your desktop on on the start menu and right-click on it.

In Shortcut tab and remove "http://www.qvo6.com...." from the Target field and click OK to save changes. 

qv06.com removal

Once you have clicked no OK you may need to un pin and re pin your shortcut to the task bar again simply find your shortcut and open it and then right click and select Pin this Program to Task bar.

If you are still experiecning issues with firefox you can also reset your web browser to original state. To use that, please follow steps below: 


1. At the top of the Firefox window, click the Firefox button; go over to the Help sub-menu and select Troubleshooting Information.

2 Click the Reset Firefox button in the upper-right corner of the Troubleshooting Information page.

Firefox will close and be reset. All data keep in Firefox will be removed, please save your important date before you move on. 

Once this has been completed i would also run another scan with your anti malware program to double make sure that it is completely gone

Thursday 5 September 2013

Adobe Error 213-19 Licensing Issues

Adobe Error 213-19

Adobe Error 213-19 is a Licensing error which will not allow you to start your adobe application wether it be photoshop to acrobat, follow the steps below to fix the issue, but please have your legitimate serial number to hand as you will need to input this in again to re setup the activation.

Log in to your Windows computer as an Administrator.
Click the following link to download the patch file:
*Adobe 213.xx Licensing Fix Tool.zip
When prompted "Do you want to open or save this file?,” click Open.


Extract the file. The location varies depending on your operating system and the utility.
Double-click the extracted LicFix_21319.exe file. If the file executes successfully, Command Prompt closes automatically.
Launch Adobe App.
Solution 2: Install the patch for Acrobat using Command Prompt (Windows only).

1. Run the Command Prompt as an Administrator.
2. Navigate to the location of the extracted hot fix in Solution 1 (Step 4).
3. Type LicFix_21319.exe to execute it.
4. If the execution is successful, Command Prompt shows Exit Code:0
Run the Command Prompt as an Administrator.
Navigate to the location of the extracted hot fix in Solution 1 (Step 4).
Type LicFix_21319.exe to run it. If the file runs successfully, Command Prompt shows Exit Code:0.
Error 213-19 CMD

Solution 3: Make sure that your user account has full permissions (Read and Write).

Windows 8
C:\ProgramData\Adobe\Slstore
Or, C:\ProgramData\Adobe

Windows 7, Vista
C:\ProgramData\Adobe\Slstore
Or, C:\ProgramData\Adobe

Windows XP
C:\Documents and Settings\All Users\Application Data\Adobe\SLStore
Or, C:\Documents and Settings\All Users\Application Data\Adobe

Mac OS X 10.5.x or 10.6.x
[Home]/Library/Application Support/Adobe/SLStore
Or, [Home]/Library/Application Support/Adobe

Monday 19 August 2013

Dlink DWA-510 Constant Disconnecting or Not connecting to wireless network

DLINK DWA-510 Constant Disconnect and Reconnecting If you have the Dlink DWA-510 Wireless Network card and have been having issues with it constantly conencting and disconnecting, you have tried updating the drivers from Dlink and still no luck then i have the solution for you.

Dont just chuck the card in the bin or buy a new one as this fix is 100% guaranteed to work.
Go in to device manager and right click on your card and select properties.
Click on the last tab called Power Management.


And untick the box that says "Allow the computer to turn off this device to save power"

Click on OK and then try to conenct to your wireless network again, this works with all versions of the driver from 2008 upwards and with WPA2 / AES encryption.

If you are still having issues then i would go ahead and see if there is a newer driver and make sure that the same settings are applied as above.

Sunday 21 July 2013

How To Get Free Apps on iDevices For Free Without Jailbreaking

How To Get Free Apps on iDevices For Free Without Jailbreaking

Have you ever wanted the free apps that you can get once your iDevice is jailbroken but not wanted to lose your warranty or the hassle of un-jailbreaking when you have to take it to the shop for repairs.

Then this is for you, i have been trawling the internet as i accidently updated my device to a non jailbreakable version, but i still wanted my apps that i use all the time, but didnt want to pay for them, thats when i cam across a nice little application from a chinese developer, you dont need to speak chinese as the process is self explanitary.

Follow the steps beloew to get yourself on your way in as little as 5 minutes.

All you need is the following

An active Internet connection
A iDevice on any iOS
An this Application Here

When the app has downloaded double click on it to set it up then follow the steps.
Step 1
Free Apps 1
Click on the highlighted button.
Step 2
Free Apps
Select the Highlighted options
Step 3
Free Apps 3
And again select the highlighted option to continue
Step 4
Free Apps 4
Leave the defaults in place and click the highlighted button
Step 5
Free Apps 5
Leave the ticks in the box and click the highlighted button
Step 6
Free Apps 6
Click on the highlighted button to continue.
Step 7

Free Apps 7
Leave the tick in the box and click on the highlighted button this will finish the install of the application and open it up automatically.

Once the Application has opened up it may look a little daunting at first, and you may think that your going to need to learn Chinese to work it out but that's not the case its a pretty simple interface to work out to get the apps you want, follow the instructions below to get going.
Step 1.
Free Apps 8


When the application has opened it has 2 main areas, The Search Bar and the Top 100.


Step 2
Free Apps 9


Enter the name of the App into the search bar and click on the button to the right of the white X in the gray box, one the search has completed you will see the results below with images that you will recognize from the app store, if you hover over the name you will see that it changes to a red button as per the image above. Click on the button and it will start downloading, to check the progress click on the option highlighted at the top next to the number 4

Step 3
Free Apps 10
Here is where you plug in you iDevice, if iTunes opens please close it as we don't want to confuse the process, once its plugged in hit the highlighted button and it will start to push it to the iDevice

Step 4
Free Apps 11
You will see the progress of the transfer, once it gets to 100% you can unplug your iDevice and then check to see if it has been transferred correctly
Enjoy your free apps i will post troubleshooting tips below also

Troubleshooting

If you get any apps that do not want to open or close straight away when you try to open it then you may need to reconnect the iDevice back into the computer and then click on the button
Free App 14


Free Apps 15


You will see that when you have click the button you get a new window in the middle of the screen click on the button that is highlighted and let it run through the download


Once the Download has finished try to open upp the app again and it should work fine.
Free Apps 16

You may also get a warning about opening an app that is from another developer, just click on yes or continue, once i have a screen shot i will update the blog with the exact message.

Happy Free Apping.

Wednesday 24 April 2013

Reset Mac OSX Admin Password

Forgot Mac OSX Admin Password

This one has bugged me for a while, i support a few mac users at my workplace and also we have a mac at home, but how do you go on if you have forgotten the admin password,

You cannot install any apps as you have to input this password every time (unless you have no admin password), you may be thinking that you will have to format the computer and reinstall OSX so that you can install things again, whilsts this is an option it is also time consuming you can also restore a backup from your time capsule, but this may not fix the issue also as if the admin password has been set since the install then it will still remian on the current install.

So i hear you thinking how can we fix this ???

Ok so what we will do today is reset the default admin accounts password, it is pretty simple but you will need to have a copy of the OSX Install Disk.

For 10.7.X

Start from the Recovery HD by holding down the Cmd and R keys while starting your Mac.  If that doesn't work, hold the Alt/Option key instead -- that will show a window with all possible startup sources, including the Recovery HD -- select it. you can also use the CD Drive and boot from the disk.

10.7.x

Choose Terminal and type resetpassword all together with no spaces and press the return key.

For 10.6.X and Earlier.

To start up from your OSX Install disc, insert it in the SuperDrive or plug in the Software Reinstall drive on a MacBook Air.

Wait for the Mac OS X Install DVD window and double-click the Install icon;  or power down, then start up while holding down the "C" key.  Either way, that takes a few minutes.

Select your language when prompted.

10.6.X
On the next screen, select Utilities in the Menubar, then Reset Password.

The next option is the next step for both of the above, the Password Reset Window

Password Reset


Select the drive/partition and account you wish to change.                                  

To change the password, type it in both places, and a hint, then click theSave button.

To reset the home folder permissions and ACLs, click the Reset button.

Reboot the Mac and there you go the password is now reset without having to reinstall the Operating system and saved yourself heaps of money from not having to take it to the shop.


Issues with Windows Live Movie Maker 2012

Issues with Windows Live Movie Maker Are you having issues with Windows Live Movie Maker 2012, this could be because you have a intel onboard graphics card that only supports DirectX 9, if this is the case you will get a message saying that your hardware does not meet the requirements to run the application, this is technically not true.

You just need to install an update from microsoft to allow it to run on your current hardware.

Follow the links below for both 64bit and 32bit systems and you will be up and running in no time at all.

For 64Bit Click Here

For 32Bit Click Here

Missing Messages on Facebook

Missing Messages on Facebook

Have you even tried selling items on Facebook ?


Never seemed to get a response by a personal message or someone says they have PM'd you but it never arrived in your inbox.

This is pretty common and there are hidden messages in your inbox, if like me you dont normally fully open your mailbox just use the drop down menu and click the new message then check this out.

Click on the Drop down then onto show all at the bottom on the drop down.

You will notice that there is the word Other next to inbox, Click on this and you will see all the messages that are from people who are not in your friends list and probably people who have said they have PM'd you on your selling sites.

Once you have opened this for the first time it will then appear next to the word inbox on the drop down menu.

Wednesday 10 April 2013

Orbit Downloader Removal - Chrome Users

Orbit Downloader Removal - Chrome Users

Have you installed the Orbit Downloader and realised its crap and annoying and want rid of it. (Google Chrome Users)

Run through the normal uninstall process from Programs and Features, then reboot.

Once you have rebooted and you next go to download a file you will notice that it would appear to be still installed.

So Open a new tab in chrome. 

Type (chrome://plugins) into the address bar, find the orbit plugin and disable it.

For internet explorer i believe you can just delete the folder in the APPDATA folder in your profile, ask if you cannot find this.

Thursday 7 March 2013

Windows 8 - D3DCompiler_43.dll Missing

Windows 8 - D3DCompiler_43.dll Missing

Since Installing windows 8 on my Laptop i have noticed that i have had a few issues loading my games via steam and also standalone ones,
The error that i have come accross is Direct X related and is 2 different DLL files that are missing D3DCompiler_43.dll and also D3DCompiler_42.dll, as per image below.

D3DCompiler_43.dll

To Fix this simply go to microsofts website and downlaod the latest Direct X installer and run it, once it has finished restart your computer and then try the game again, this has happened
to me twice in the last 2 days the first time being the 42 dll and the second being the 43 dll.

Sunday 3 March 2013

God Mode - Windows 8

Enable God Mode on Windows 8

Like in Windows 7, you can also add the God Mode Shortcuts to your desktop in windows 8. God Mode gives you more than 230 shortcuts, all the control panel and setting items that you have on your computer.

Follow the steps below to add God Mode to your computer.

1. Create a new folder anywhere on your desktop. Right click on your Desktop and create new folder.

God Mode 1

2.Once created, rename the folder from ‘New Folder’ to this exact code, Including the words GodMode at the front.

GodMode.{ED7BA470-8E54-465E-825C-99712043E01C}

Once you have copied the text above press the enter key.

God Mode 2

The folder icon will change to the Control Panel Icon.

God Mode 3

Open up the shortcut to reveal over 230 items to chose from, all of which can be found in various ways from searching on the Start Menu or within the Control Panel itself.

God Mode 4