Sunday 7 October 2012

Workers at Foxconn strike yet again over the iPhone 5

Workers at Foxconn strike yet again over the iPhone 5
Workers at Foxconn's Zhengzhou factory strike in reaction to new iPhone 5 quality standards.


So you waited a few weeks to get your new iPhone 5, only to open the box and find that it has some scratches and marks around the outside edge.

So Apple have asked Foxconn to adhere to a stricter quality control program for the new iPhone 5, this in turn has sparked outrage among some of the workers and they have decided that they would strike over the demands.

According to China Labor Watch, three to four thousand workers stepped off the production line to protest the new standards, which only allow for a 0.02mm appearance defect. "It's tough under such stringent quality requirements," writes Sina Weibo user and Foxconn employee Yefudao. "A 0.02mm appearance defect is already beyond that of our vision. With such a demanding task, workers' mental pressure becomes so immense that they have to vent it out."

China Labor Watch reports that the issue stems not only from the higher quality demands, but the fact that workers are being asked to meet them without receiving the training necessary to do so. The situation hasn't broken out into a riot, but a dispute between line workers and quality control inspectors reportedly sparked a fight that led to property damage, injury and some hospitalization. Production lines have temporarily been frozen by management while Foxconn deals with the situation.

Whilst i can understand our frustrations about buying a new iPhone 5 and it already being scratched before you even use it, i can see where the Chinese workers are coming from, i do have a few marks on my iPhone 5 but nothing that i will be sending it back about, after all the outer edge of the iPhone 5 is metal painted black it would be extremely difficult to not get any marks on this item during production, maybe this infact an issue that apple should have thought about before putting it into production, sure metal would be the ideal substance for the part but maybe a better protective coating of paint or even powder coating might have been better.

We will just have to see how long the riots and strikes go on for or if Apple will change the provider of the manufacturing process to another company if the defects still keep happening.

LG Smart Tvs To rent out Disney 3D Movies

LG Smart Tvs To rent out Disney 3D Movies If you like me own a LG Smart 3D TV you may seen that the 3D World content has now started to show Disney movies to rent, you can watch a small 2 or 3 minute trailer of each of the available movies and you can rent them for roughly $8 AUS for 3 days.


So far the selection is not huge but it is a start of a whole new world of renting out media on the Smart TV's.


This means movies from studios such as Disney Pixar, Walt Disney Pictures, Marvel and Touchstone Pictures will available to rent in three-dee directly from LG's 3D World, including The Avengers, Toy Story, Alice in Wonderland and, later next year, Finding Nemo.

Gone are the days when you have to head out to the rentals store and take your time sifting through the ones you want to watch, all we need now is to get the popcorn popping and were fully set.

iCloud: Extended complimentary storage for former MobileMe members

iCloud: Extended complimentary storage for former MobileMe members
Apple Has Extended the complimentary storage for former MobileMe members


If you are a former MobileMe member and had access to more than 5GB of MobileMe storage when you moved your account to iCloud, then you received a complimentary iCloud storage upgrade automatically. That upgrade has now been extended, free of charge.

How much complimentary storage did I receive?
Your complimentary storage upgrade was based on the amount of MobileMe storage you were paying for when you moved to iCloud. You were granted either the 10GB, 20GB, or 50GB storage upgrade.

To check which storage upgrade you received:

On an iOS device: Go to Settings > iCloud > Account.
On a Mac: Go to System Preferences > iCloud, then click Manage followed by View Account.
On a PC: Open the iCloud Control Panel for Windows, then click Manage followed by View Account.

How long does the complimentary storage extension last?
We will continue to provide you with this additional storage until September 30, 2013, or until you choose to upgrade your iCloud storage plan.

Can I buy more storage if I need it?
Yes. If you need to upgrade your storage to a larger amount, you can purchase one of our standard storage upgrade plans at the regular price.  Please note that when you purchase a new storage upgrade, it will replace your complimentary storage plan. If you cancel the upgrade at a later date, you will return to the standard free 5GB storage plan and will no longer have access to your complimentary storage upgrade.

What if I already upgraded my storage plan prior to this extension?
If you upgraded your storage plan before September 30, 2012, we have automatically extended your upgrade at no additional charge until September 30, 2013.

Can I transfer my complimentary storage upgrade to another account?
Your complimentary storage upgrade is not transferable. You can use it only with the iCloud account that you originally moved from MobileMe.

Thursday 4 October 2012

GameKlip - unleash the inner console of your smart phone

GameKlip - unleash the inner console of your smart phone I was surfing the internet the other day when i came across this awesome new piece of equipment, it basically allows you to use your PlayStation Dualshock 3 controller to play games on your smartphone, the ingenious piece of kit called a GameKlip, just simply clips around your controller and has a mount for your smartphone.

GameKlip comes in 2 versions, a wired version and also a wireless version, you do have to install an app called Sixaxis Controller (can be found in the Google Play Market) to allow the controller to work on the smartphone but it brings a whole new way of playing those games you have on your phone, there is also a tablet version of GameKlip in the making too which will be released very soon.

This only appears to be out for Android smartphones at the moment but I am sure there will be a Apple variant along in the not to distant future.

GameKlip
GameKlip
GameKlip

To purchase the GameKlip head over to their website and purchase it from their online shop here.
The wireless version will set you back $15 plus P+P and the wired equivalent will set you back $23 plus P+P and all prices are in US$

Setting up Split DNS in Windows Server 2008

Setting up Split DNS in Windows Server 2008 Recently i ran into a huge brick wall at work, we had just got a new dedicated internet service and we had to purchase an enterprise grade router, we went with the Cisco 881 with advanced IP as recommended by the ISP, this wasn't an issue as i am familiar with Cisco IOS and command line programming, I have a number of web servers in house for the websites that I host, as I have multiple sites running on a single server I need to use the domain and sometimes the sub domains to access them, the IP address with the port at the end just simply does not work internally.
I ended up having to ask for some support from the Cisco Help Desk as this was something that i could not work out on my own, I explained my situation and he explained that what i wanted to do was simply disabled by default in the Cisco IOS as it was a security issue, so after a few days of trying different things the Cisco support guys told me that what i wanted to achieve wasn't going to work , he had tried to setup NAT on a stick and also loop backs to direct outbound traffic via the loop back address, none of these worked with my setup of the websites.
I had to have a rethink about how to tackle this issue, then i was reading on the MSDN forums about a similar issue and the way in which it was approached was to setup Split DNS or Split Brain DNS as some call it. I knew what it was but just never thought of using it in my situation, I didn't have nothing to lose so I set out my plan to set this up and it was pretty straight forward. I have 3 domains that I use, My main website is hosted externally but I have 2 other servers for testing, dev and staging these are hosted internally.
To setup Split DNS follow the steps below.
Connect to your Domain Controller and open up your Server Manager just next to your Start button

Expand the roles section and then expand the DNS Server role and then expand DNS,

Then finally expand the server and you will  see there are 4 options, Global Logs, Forward Lookup Zones, Reverse Lookup Zones and Conditional Forwarders.

We want to expand the Forward Lookup Zones as this is where we will be making the changes.

You will see from the above image that i already have my domain names in there so we are going to add another one in there, so right click on the Forward Lookup Zones and click on New Zone ...

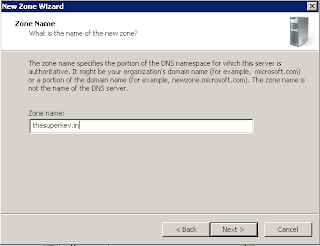
You will then see the New Zone Wizard, click on Next to continue.


Choose a Primary Zone and tick the box to (Store the zone in Active Directory) then click on next.
 
You want this zone to replicate across all DNS servers running on domain controllers then click on next.
 
 You then need to enter the name of the zone this is the domain name that you are wanting to use, in my case this is thesuperkev.in, then click on next.

I want to allow only secure dynamic updates then click on next.
 
And finally review the name is the correct name then click on the finish button to add the zone.
 
So that is the zone now in place if you expand the zone you will see that it automatically puts in 2 records for you the Start of Authority (SOA) and Name Server (NS) records.

For this to work properly we need to add in the www and the naked entries and where they point to do do this we need to right click on the zone name and click on New Host (A or AAAA)

The first record we are going to create is the naked domain record so basically the http://thesuperkev.in record, so we leave the Name blank, in the IP address put in the External Public IP address of your host, the Create associated pointer is ticked by default you can leave this although it may complain, this is fine.

The next record we want to add is the www. record this will also point to the External IP address of your host. just like the above entry you can once again just leave the Create associated pointer checked, Click on Add Host.
 
You will now see that in your zone you have 4 entries now the 2 default ones and the 2 we just created, if like me you have internal uses for the domains also here is where you need to add in the sub domains you require.

If you have a dev server and want to use the internal address of dev.thesuperkev.in then do the same process again add a new A Host record but this time instead of putting in the external ip address put in the internal ip.

That is pretty much it for setup you will now be able to use the live site on the www. and naked domain that will divert to the correct address, if you do not put these 2 records in then you will get the page cannot be displayed in your browser.


Tuesday 2 October 2012

No paste options in Microsoft Office

Lose ability to paste in Microsoft Office Programs

I have had a number of calls recently regarding being able to paste tables and such within word and excel, this one was a strange one to work out and took me a while before I came to the conclusion that it was good old Mr Skype, what basically happens is that you can still paste but it will only paste basic text, no formatting or anything special just basic text and that is it, sometimes you completely lose the ability to paste but this is only very rare cases.

If this has happened to you the first thing to check is that Skype Click to Call is installed, you can check this by going on to the internet and just checking anything on google that has a number next to it you will see is looks like the image below.

If you see anything like the above image then this will be the offender, To remove it you can simply find it in the control panel in Add Remove Programs, if you uninstall this it has no effect on Skype itself it just removes the click to call feature.

Once it has been removed restart your computer and you will notice that you paste features are back to normal once again.


Thursday 27 September 2012

Stop Automatic eBay Seller Fees taken by paypal

Remove eBay's Automatic Payments from Paypal

If like me you like to sell the odd thing or two on eBay  you will have noticed that recently eBay changed their policies and you now have to have Automatic payment method setup before you can list items for sale.

This can be a pain as the fees automatically come out of your associated bank account or off your debit/credit card at random times and you may not have the funds available at that time, you still have to put this information in there before it will allow you to list your items, but who is to say that you cant remove that out of Paypal after you have listed your items.

I don't mind having to pay my seller fees to eBay using Paypal but i would like to pay them when it suits me and being paid monthly usually means that i get close to the red line come the end of the month and that usually when eBay decides they want their money, gone have the old days when they would email you an invoice and tell you when the money had to be paid by, they just up and take the money when they feel like it.

To get around this one its simple we just need to remove the Automatic Payment from with in paypal but i hear you speak where the hell is it !!! it took me a while to figure it out and eventually i found where it was, follow the steps below and you will soon be free of this predicament.

Login to the Paypal website with your details and when it has loaded into "My Account" click on the Profile option on the right hand side of the screen like the image below.

When you are in the Profile section you have four options on the left hand side, My Personal Info, My Money, My Settings and My Selling Tools, we want to be on the My Money tab and then click on Update on the My pre-approved payments option as per the image below.

In there you will see eBay International AG and the status to the side of it will say Active go ahead and click on the eBay International AG, once it has loaded up you will see that the status says active and there is a Cancel button. click on cancel and this will then cancel the automatic payment you will also receive and email from Paypal telling you that you have just cancelled the payment agreement.

You can now relax knowing that eBay or Paypal will not be taking any money out of your account until you are ready to pay them yourself, please note that you wont be able to list items again until you re-enter the details back into eBay, but if you do not sell a lot of items then this wont be a big issue.

Mapping Network Drive with Visual Basic Script

Mapping Network Drive with Visual Basic Script Following on from the Visual basic script for adding printers, this time i will give you an example of how to map network shares as drives.
This is pretty similar to the Print Script and uses the same formatting, the following example maps two drives R and S drives if you want to add more then you will need to change the script accordingly.
The script starts out with the (On Error Resume Next) again like the printer script so that it will move onto the next line of code if there is any errors
On Error Resume Next 
Set objSysInfo = CreateObject("ADSystemInfo") 
Set objNetwork = CreateObject("Wscript.Network") 
'removes mapped drive R 
objNetwork.RemoveNetworkDrive "R:", True, True 
'removes mapped drive S 
objNetwork.RemoveNetworkDrive "S:", True, True 
'creates maped drive R 
objNetwork.MapNetworkDrive "R:", "\\Server\Share1" 
'creates maped drive S 
objNetwork.MapNetworkDrive "S:", "\\Server\Share2" 
This script will remove the two drives before it adds them as with the printer script, un like the printer script it still works even if the drives are not already mapped, if they are already there it will remove and re-add them.
You can simply copy and past this script and change it to suit your needs this also needs to be saved with the file extension of *.vbs (mapdrives.vbs) and can be used with a Group Policy or can be double clicked and run.

Adding Printers with a Visual Basic Script

Adding Printers with a Visual Basic Script If you are a Network Administrator or work in a IT Role and it is your responsibility to install printers and maintain the network then this script will save you lots of time, if you take care of more than 10 computers you will know that having to install the same thing on each one can be pretty laborious, if you are running a Windows Server environment with a domain, you can use group policies to deploy your printers, Windows Server 2008 has a Deployed Printers option built in but can be sometimes unreliable, if you find that this is the case then you can use my script to deploy your printers.
We start out by opening notepad or any other txt file editor, on the first line we want to put in the following without the brackets,
(on error resume next) 
this tells the program when you encounter an error just continue at the next line. The next line we use the
Set objNetwork = CreateObject("WScript.Network") 

WScript.Network is a scripting object that provides methods and properties that allow for manipulation of network objects.
The next line you add in the printer
objNetwork.AddWindowsPrinterConnection "\\Server\Printer Shared Name"
after it has added the printer you will need to set it as the Default printer if you have more than one printer installed
objNetwork.SetDefaultPrinter "\\Server\Printer Shared Name"

So your finished script will look like this.
on error resume next
Set objNetwork = CreateObject("WScript.Network")
objNetwork.AddWindowsPrinterConnection "\\Server\Printer Shared Name"
objNetwork.SetDefaultPrinter "\\Server\Printer Shared Name"
Save this with the file extension of *.vbs for example addprinter.vbs and then you can use it as a script in the logon process with a group policy, or if you simply double click on the file it will install the printer for you, if you are deploying this with group policy you will want to remove it after successful installation as it will not work the second time around, unless you change some of the parameters, as it will already be installed it will give you an error, the change to the script that is required is below
'objNetwork.RemovePrinterConnection "\\Server\Printer Shared Name"
This goes above the objNetwork.AddWindowsPrinterConnection "\\Server\Printer Shared Name" line in the script so your script will now look like this below.

on error resume next
Set objNetwork = CreateObject("WScript.Network")
'objNetwork.RemovePrinterConnection "\\Server\Printer Shared Name"
objNetwork.AddWindowsPrinterConnection "\\Server\Printer Shared Name"
objNetwork.SetDefaultPrinter "\\Server\Printer Shared Name"

Wednesday 26 September 2012

Setting up a Cisco Route-map - Local LAN Access on VPN

Setting up a Cisco Route-map - Local LAN Access on VPN I recently setup a Cisco VPN for me to access my server at home remotely this was great but i realized that when i was connected i could not get on to the server with RDP or VNC, i had already set these up from a external connection where the VPN wasnt accessible by putting in simple port forwarding rules.
What i wanted to achieve was to be connected to the VPN and use my services that i could do from my port forwarding rules.
I had to do the following to get this working.
Here are my original rules to allow access from external connections without the VPN.
ip nat inside source static tcp 192.168.2.120 5900 interface Dialer0 
ip nat inside source static tcp 192.168.2.120 5800 interface Dialer0
ip nat inside source static tcp 192.168.2.120 3389 interface Dialer0

I realized that these rules were not going to work whilst on the VPN because it was trying to route through the Dialer0 interface, i needed to setup a route-map, first things first i had to create a new ACL which i numbered 120, then permit the ip range my range for my VPN connection was 192.168.5.0 0.0.0.255 so the access-list would look like this,
access-list 120 permit ip 192.168.2.0 0.0.0.255 192.168.5.0 0.0.0.255

I then moved onto setting up the route-map i named it Bypass-NAT, type the following into your rotuer

route-map Bypass-NAT deny 10
match ip address 120
route-map Bypass-NAT permit 20

You can copy and paste these lines of code but only 1 line at a time, now that you have the ACL in place and also the route-map you will need to re write your rules for you port forwarding, so delete the old rules by typing the following,
no ip nat inside source static tcp 192.168.2.120 5900 interface Dialer0 
no ip nat inside source static tcp 192.168.2.120 5800 interface Dialer0
no ip nat inside source static tcp 192.168.2.120 3389 interface Dialer0

when you have done this write back your config then put in the new port forwarding rules like below

ip nat inside source static tcp 192.168.2.120 5800 YOUR.PUBLIC.IP 5800 route-map Bypass-NAT extendable
ip nat inside source static tcp 192.168.2.120 5900  YOUR.PUBLIC.IP  5900 route-map Bypass-NAT extendable
ip nat inside source static tcp 192.168.2.120 3389  YOUR.PUBLIC.IP 3389 route-map Bypass-NAT extendable

Once again write back your config and try to RDP from external and test, then connect your Cisco VPN Client and try to RDP to the private IP, everything should be working fine.