I ended up having to ask for some support from the Cisco Help Desk as this was something that i could not work out on my own, I explained my situation and he explained that what i wanted to do was simply disabled by default in the Cisco IOS as it was a security issue, so after a few days of trying different things the Cisco support guys told me that what i wanted to achieve wasn't going to work , he had tried to setup NAT on a stick and also loop backs to direct outbound traffic via the loop back address, none of these worked with my setup of the websites.
I had to have a rethink about how to tackle this issue, then i was reading on the MSDN forums about a similar issue and the way in which it was approached was to setup Split DNS or Split Brain DNS as some call it. I knew what it was but just never thought of using it in my situation, I didn't have nothing to lose so I set out my plan to set this up and it was pretty straight forward. I have 3 domains that I use, My main website is hosted externally but I have 2 other servers for testing, dev and staging these are hosted internally.
To setup Split DNS follow the steps below.
Connect to your Domain Controller and open up your Server Manager just next to your Start button

Expand the roles section and then expand the DNS Server role and then expand DNS,

Then finally expand the server and you will see there are 4 options, Global Logs, Forward Lookup Zones, Reverse Lookup Zones and Conditional Forwarders.

We want to expand the Forward Lookup Zones as this is where we will be making the changes.

You will see from the above image that i already have my domain names in there so we are going to add another one in there, so right click on the Forward Lookup Zones and click on New Zone ...

You will then see the New Zone Wizard, click on Next to continue.


You want this zone to replicate across all DNS servers running on domain controllers then click on next.

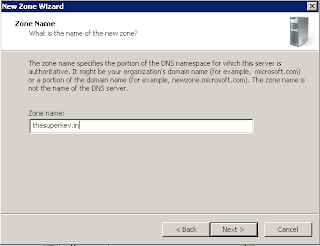
You then need to enter the name of the zone this is the domain name that you are wanting to use, in my case this is thesuperkev.in, then click on next.

I want to allow only secure dynamic updates then click on next.

And finally review the name is the correct name then click on the finish button to add the zone.

So that is the zone now in place if you expand the zone you will see that it automatically puts in 2 records for you the Start of Authority (SOA) and Name Server (NS) records.
For this to work properly we need to add in the www and the naked entries and where they point to do do this we need to right click on the zone name and click on New Host (A or AAAA)

The first record we are going to create is the naked domain record so basically the http://thesuperkev.in record, so we leave the Name blank, in the IP address put in the External Public IP address of your host, the Create associated pointer is ticked by default you can leave this although it may complain, this is fine.

The next record we want to add is the www. record this will also point to the External IP address of your host. just like the above entry you can once again just leave the Create associated pointer checked, Click on Add Host.

You will now see that in your zone you have 4 entries now the 2 default ones and the 2 we just created, if like me you have internal uses for the domains also here is where you need to add in the sub domains you require.

If you have a dev server and want to use the internal address of dev.thesuperkev.in then do the same process again add a new A Host record but this time instead of putting in the external ip address put in the internal ip.

That is pretty much it for setup you will now be able to use the live site on the www. and naked domain that will divert to the correct address, if you do not put these 2 records in then you will get the page cannot be displayed in your browser.
1 comment:
thank you
Post a Comment