Thursday 7 March 2013

Windows 8 - D3DCompiler_43.dll Missing

Windows 8 - D3DCompiler_43.dll Missing

Since Installing windows 8 on my Laptop i have noticed that i have had a few issues loading my games via steam and also standalone ones,
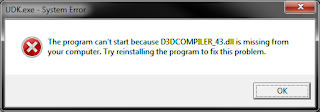
The error that i have come accross is Direct X related and is 2 different DLL files that are missing D3DCompiler_43.dll and also D3DCompiler_42.dll, as per image below.

D3DCompiler_43.dll

To Fix this simply go to microsofts website and downlaod the latest Direct X installer and run it, once it has finished restart your computer and then try the game again, this has happened
to me twice in the last 2 days the first time being the 42 dll and the second being the 43 dll.

Sunday 3 March 2013

God Mode - Windows 8

Enable God Mode on Windows 8

Like in Windows 7, you can also add the God Mode Shortcuts to your desktop in windows 8. God Mode gives you more than 230 shortcuts, all the control panel and setting items that you have on your computer.

Follow the steps below to add God Mode to your computer.

1. Create a new folder anywhere on your desktop. Right click on your Desktop and create new folder.

God Mode 1

2.Once created, rename the folder from ‘New Folder’ to this exact code, Including the words GodMode at the front.

GodMode.{ED7BA470-8E54-465E-825C-99712043E01C}

Once you have copied the text above press the enter key.

God Mode 2

The folder icon will change to the Control Panel Icon.

God Mode 3

Open up the shortcut to reveal over 230 items to chose from, all of which can be found in various ways from searching on the Start Menu or within the Control Panel itself.

God Mode 4


Monday 7 January 2013

Windows 8 Shortcuts and Tips

Untitled Document

Navigating Windows 8 can be a nightmare if you are used to the start button, and also depend on it so much.

Here are a few shortcuts and helpful tips to get you on your way, as i already mentioned in an earlier post you can get the start button back with the stardock app.

  • Press the Windows key to open the Start screen or switch to the Desktop (if open)
  • Press the Windows key + D will open the Windows Desktop.
  • Press the Windows key + . to pin and unpin Windows apps on the side of the screen.
  • Press the Windows key + X to open the power user menu, which gives you access to many of the features most power users would want (e.g. Device Manager and Command Prompt).
  • Press the Windows key + C to open the Charms.
  • Press the Windows key + I to open the Settings, which is the same Settings found in Charms.
  • Press and hold the Windows key + Tab to show open apps.
  • Press the Windows key + Print screen to create a screen shot, which is automatically saved into your My Pictures folder.
Task Manager


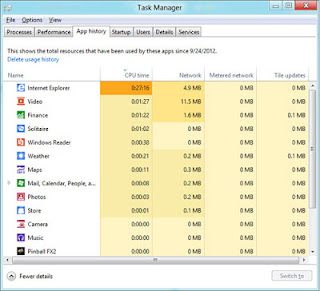
The Windows 8 Task Manager has been significantly improved over previous versions of Windows. Some of the new changes include showing a total percent usage at the top of your Processes, which makes it easier to determine total memory and CPU usage, improved Performance graphs, a Startup tab to see startup processes and their impact to system performance, and the App history tab (as shown below) that gives you the total resources an app has used over a period of time. Press Ctrl + Shift + Esc to start exploring the new Task Manager.


Windows Search

With Windows 8 if you are on the start screen you can simply just start typing to search for anything you are looking for, weather it be an app or a file, just type the letters and your results will start to appear on the left hand side.
The Search is also found through Charms and can also be opened by pressing Windows key + F.

Hot Corners

The corners on your screen are hot corners and give you access to different Windows features. Below, is a brief explanation of each of these corners.

Bottom Left-hand corner

The bottom left-hand hot corner of the screen will allow you to access the Start screen, if you're in the Start screen and have the Desktop open, this corner will open the Desktop from the Start screen.
Right-clicking in the left hand corner will open the power user menu.

Top-left corner of the screen

Moving the mouse to the top-left corner and then down will display all the apps running on the computer. Clicking and dragging any of these apps to the left or right-hand side of the screen will snap that app to that side of the screen. Each of these open app icons can also be right-clicked to close or snap.

Right-hand side of the screen

On the full right-hand side of the screen will be given access to the Windows Charms.

Tuesday 6 November 2012

Join Openfiler to Windows Domain


This one has been a thorn in my side for weeks, i have tried many different guides to join our openfiler to the domain, each time it would never give me the groups in the listing, then i thought lets just go back to linux basics.

I had already made the change in the security to allow enable NTLMv2 response, this got me a little further as it would add the openfiler computer into the domain computers group but using the GUI never worked for me along side it taking an age to reload the page after it had done.

So what to do...

Firstly i logged in to the GUI and then went to System and Secure console, logged in as my root account type cd / and enter, then i just thought ill just run the string to join it to the domain in here, so i did the following (net rpc join -U Administrator@domain)pressed enter and was asked for the password for Administrator @domain i put in the password and pressed enter and it said successfully joined give it a reboot and viola, checked the group and there were 9 whole pages of groups and all of the users in my domain.

You can also check that it is joined correctly by using the following command in the shell (net rpc testjoin) if it is successfully joined you will recieve the response (Join to "DOMAIN" is ok)

I can now administer my shares using my domain groups.

Monday 5 November 2012

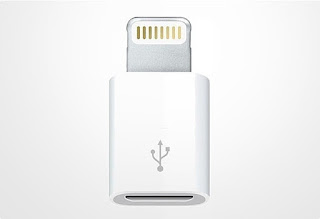
New Lightening to Micro USB now available in the US

New Lightening to Micro USB now available in the US

It looked for a short while that the Lightening to Micro USB connector was going to only be available in Europe, but Apple has decided to sell it in the USA too, the tine adapter finally made its way to the US Apple store website for only $19 US (over in Europe, it's £15 / €19) i am not sure of the release date for Australia but it wont be too far away.

Lightening connector

Will this be one of many adapters converting us from the lightening connector, me personally am still waiting for the connector to allow me to use my existing dock, although im doubtful it will allow me to charge my phone when it arrives.


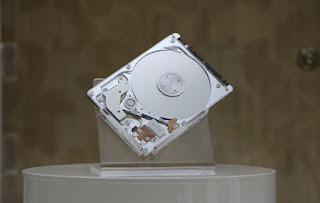
A*STAR unveils a new Hybrid drive thats 5mm thick

A*STAR unveils a new Hybrid drive thats 5mm thick

A*STAR's Data Storage Institute has unveiled a new Hybrid drive that is only 5mm thick, and at 1tb with a 32GB SSD thrown in, its a pretty good contender for the latest and greatest 2.5 inch drives.

A-Drive

Its named the A-Drive and has a new proprietary motor and 30 additional patents to lower the power consumption, A*STAR envisions the drive to work in not only laptops/ultrabooks but also the latest tablet computers too, this could stretch the battery life by up to 30% .

A*STAR has said that the Hybrid drive will be cheaper than SSD's currently used in ultrabooks  and Yahoo! News reports it could be as little as $73 US.

Want this drive now, unfortunately we could be waiting upto 8 months before we see them for sale in the retail market as A*STAR aare still trying to cut a deal with manufacturing partners, so keep an eye out.

Monday 29 October 2012

Find out what TCP/UDP Ports are being used and by what program

Find out what TCP/UDP Ports are being used and by what program

I have been asked a few times in the past why certain programs will not work, mainly web-servers running on port 80, the sites wont start due to another application using the port.

There is a simple command you can run to cross check with task manager what ports are being used, you may already be familiar with netstat it is used for many things within the OS to check what your computer is doing on the internet, simply doing a "netstat -n -n -o" in a command prompt will give you a lot of results, showing all the inbound and outbound connections and what ports are being used.

If you specifically want to find a certain port you can use the pipe command after and the word findstr so the command would look like this netstat -a -n -o | findstr :80 this would find all the connections that are on port 80 in and out.

To drill down even further you need to put in 0.0:80 at the end so the command will look like this netstat -a -n -o | findstr 0.0:80 this will then give you a very small number of results specifically for the local host and anything with 80 in there as you can see from my picture it has both port 80 and port 8080.

 Now you will notice at the end of the results are some numbers these are whats known as the PID and we can cross check these in Windows Task Manager, then by going to the Services tab you will see there is a column with PID sort by numerical order and find the matching number to give you the service which is using the port, and if you need to stop the service.


Sunday 28 October 2012

How to convert videos for iPad / iPhone / iPod and other Mobile Devices

How to convert videos for iPad / iPhone / iPod and other Mobile devices

I have been asked a few times how i convert my videos so that they can be watched on the iPad / iPhone or iPod, whilst there are many programs out there that will do this for you and even iTunes itself not all videos will convert due to the source format, and also many of the programs are not free.

I personally use a program called Handbrake which is free and available on many operating system platforms. I am a windows user for my day to day computing so i will show you how to convert them using windows 7 and Handbrake.

First of all you need to get a copy of Handbrake which is free from here it comes in 2 versions for windows 64 bit and 32 Bit, if you are not sure what version of windows you have then just choose the 32 Bit version as this will work on both 64 and 32 bit.


Once it has downloaded open up the setup file and proceed to install it, click on Run.

Then click on Next.

Then I Agree.

Leave the default settings in place and click on Install. Once it has installed.

Click on Finish and you will now have the program available on the Start Menu.

Now find the program on the Start Menu and open it up.


You may get a Preset Update appear just click on ok as this is normal.

Once Handbrake is opened up you will see the image below.

There are 2 ways to convert your files if you have a folder of videos that you want to do in a batch you can do but today i will just show you how to convert just a single video file as it wont take as long.

I Have created a folder for my outputted files as i don't want them to go into the same folder that they came from just so that its not confusing. My folder is just in My Documents and Called iPad Videos.


Click on the Source button and then select the Video file option, now you just need to select your video file that you want to convert.

Once selected you will see that next to the word Source your video file will be displayed. We now need to select the Destination folder.

Click on the Browse Button and save the file into you iPad videos folder in My Documents, giving it the name of choice then click on the Save button.


The next thing we need to do is select the preset that we would like the video to be in, as we are doing this tutorial for a iPad video select iPad from the right hand side, you will see that it automatically changes the display size of the video. 


All we have to do now is to press the Start button and wait for it to finish this can take anywhere between 30 mins to 2 hours depending on the spec of your computer, so go and make yourself a cup of tea and sit back and relax.

You will see at the bottom of the screen it give you a rough estimate of how long is remaining until it has finished.

In the next part of the tutorial i will show you have to get these videos into iTunes and eventually onto your iPad so that you can watch them at you leisure.


Windows 8 - No Media Center Built in

Windows 8 - No Media Center Built in

Microsoft have slipped this one under the radar, it appears that all of you Media center PC owners that actually use Windows Media Center, will not be getting Media Center and its codecs for DVD playback and broadcast TV from Windows 8 instead you will have to pay for the add-ons.


However for people that bought the Pro version of Windows 8 will be able to get these add-ons for free until January 31st 2013, once the date has passed you will then have to pay for these extras if you should want them, Users that do want the freebies will have to input their product key on the Microsoft Website to get the files.

Microsoft Never released the actual cost of the add-ons only referring to it as "economical" but i can tell you that it will cost you an extra $10  for the content.

You can get the add-on from the link here, please let me know if you are able to get this without being on a pro version of windows 8.

Friday 26 October 2012

Windows 8 Released

Windows 8 Released

So today is the day that Windows 8 is released, but the big question is will you be buying it ?

The Microsoft CEO Steve Ballmer called the introduction of Windows 8 a "bold, innovative" move that had been tested for more than 1.24 billion hours worldwide.

"No product anywhere receives this kind of testing anywhere in the world," Mr Ballmer told a New York audience.

But this new flavour of Windows has changed its appearance dramatically with the ditched start button and new full screen start screen. This screen now contains all the well known apps and extra ones that you can get from Windows Store.

Microsoft Windows business leader Tina Flammer said users would need to adapt to the new software menus, but it had been designed for an easy transition.

"Windows 8 was designed to be intuitive," she said.

"We know that without the traditional (start button) it is different. Every time we bring out a device the familiarity is different."

Microsoft faced further scrutiny at its Australian launch for differences around the software's pricing and packages.

While it wont be available to buy as a full product in stores over here it will be available as an upgrade.

The Windows 8 Pro upgrade package costs $69.99, she said, while the Windows 8 upgrade costs $39.99.

You can also upgrade from Windows XP,Vista and Windows 7 which is slightly different from Windows 7 that could only be upgraded from Windows Vista.

This version is going to be very important for Microsoft's Future in the Software business if this flops could it be the end for Windows, who knows i think not but it could severely impact them in future releases.

Earlier this week i Blogged about how to add the missing start button back this can be found here.